> ## Documentation Index
> Fetch the complete documentation index at: https://docs.linqra.com/llms.txt
> Use this file to discover all available pages before exploring further.
# Keycloak Configuration
> Identity and Access Management for Linqra
## Overview
Keycloak serves as the Identity and Access Management (IAM) solution for Linqra, providing robust authentication and authorization capabilities. It manages user identities, roles, and access policies while supporting various authentication protocols including OAuth 2.0 and OpenID Connect.
## Access Information
### Admin Console
```bash theme={null}
URL: http://localhost:8281/
Username: admin
Password: D!pme$Gateway77
```
For production environments, it's crucial to change the default admin credentials to ensure security.
The default credentials (admin/D!pme\$Gateway77) should only be used in development environments.
## Configuration Steps
### 1. Create New Realm
A realm in Keycloak manages a set of users, credentials, roles, and groups. Follow these steps to create a new realm:
1. Log in to the Keycloak Admin Console (admin, admin for dev)
2. Click on the dropdown in the top-left corner (default shows "master")
3. Click "Create Realm"
4. Enter "Linqra" as the Realm name
5. Ensure "Enabled" is switched ON
6. Click "Create"
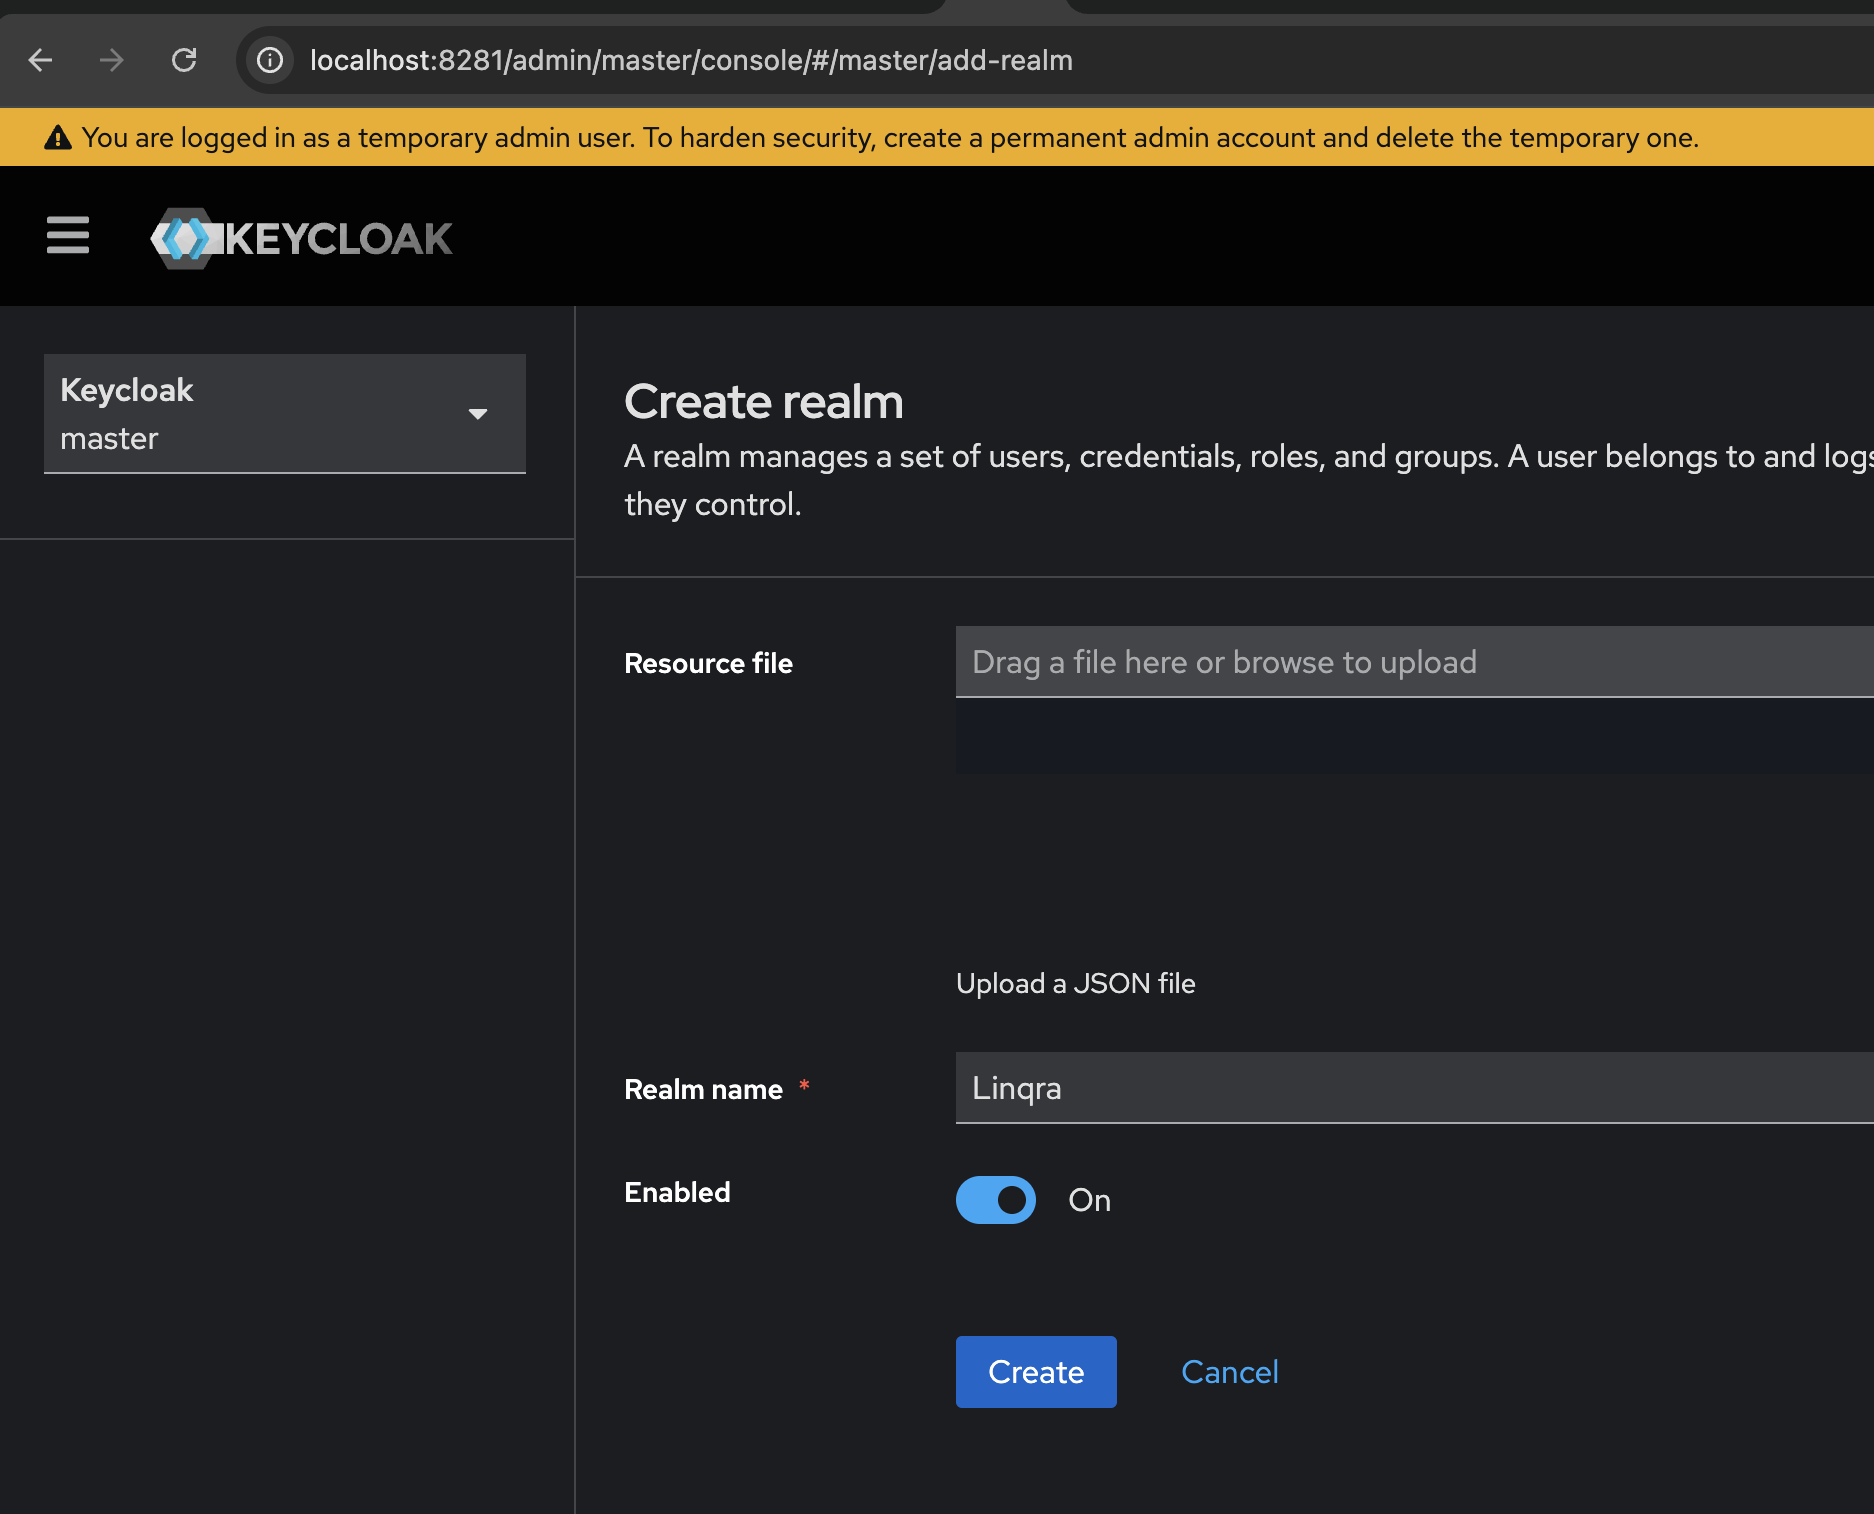 The master realm should only be used to create and manage other realms. Create a separate realm for your application.
### 2. Create New Client
After creating the realm, you can either import the configuration or set it up manually.
#### Option 1: Import Configuration (Recommended)
You can skip the manual configuration by importing the client file.
1. Download the [Linqra Gateway Client Configuration](/images/linqra-gateway-client.json).
2. In the **Linqra** realm, click "Import client" and upload the file.
The master realm should only be used to create and manage other realms. Create a separate realm for your application.
### 2. Create New Client
After creating the realm, you can either import the configuration or set it up manually.
#### Option 1: Import Configuration (Recommended)
You can skip the manual configuration by importing the client file.
1. Download the [Linqra Gateway Client Configuration](/images/linqra-gateway-client.json).
2. In the **Linqra** realm, click "Import client" and upload the file.
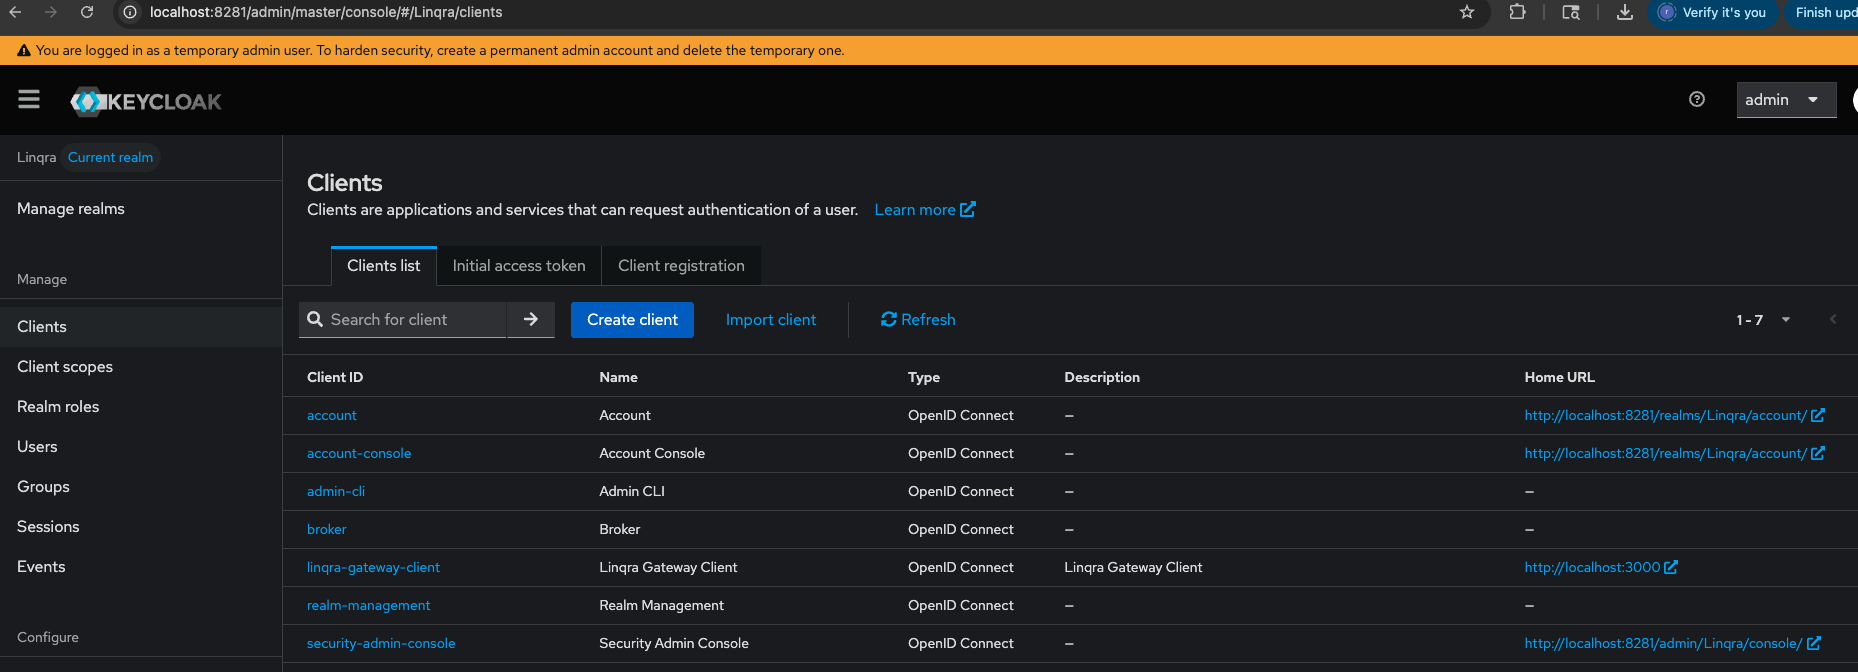 #### Option 2: Manual Configuration
If you prefer to configure it manually, follow these steps:
##### General Settings
1. Navigate to "Clients" in the left sidebar
2. Click "Create client"
3. Set the following general settings:
* Client ID: `linqra-gateway-client`
* Name: `Linqra Gateway Client`
* Description: `Linqra Gateway Client`
* Always display in UI: `ON`
* Click "Next"
#### Option 2: Manual Configuration
If you prefer to configure it manually, follow these steps:
##### General Settings
1. Navigate to "Clients" in the left sidebar
2. Click "Create client"
3. Set the following general settings:
* Client ID: `linqra-gateway-client`
* Name: `Linqra Gateway Client`
* Description: `Linqra Gateway Client`
* Always display in UI: `ON`
* Click "Next"
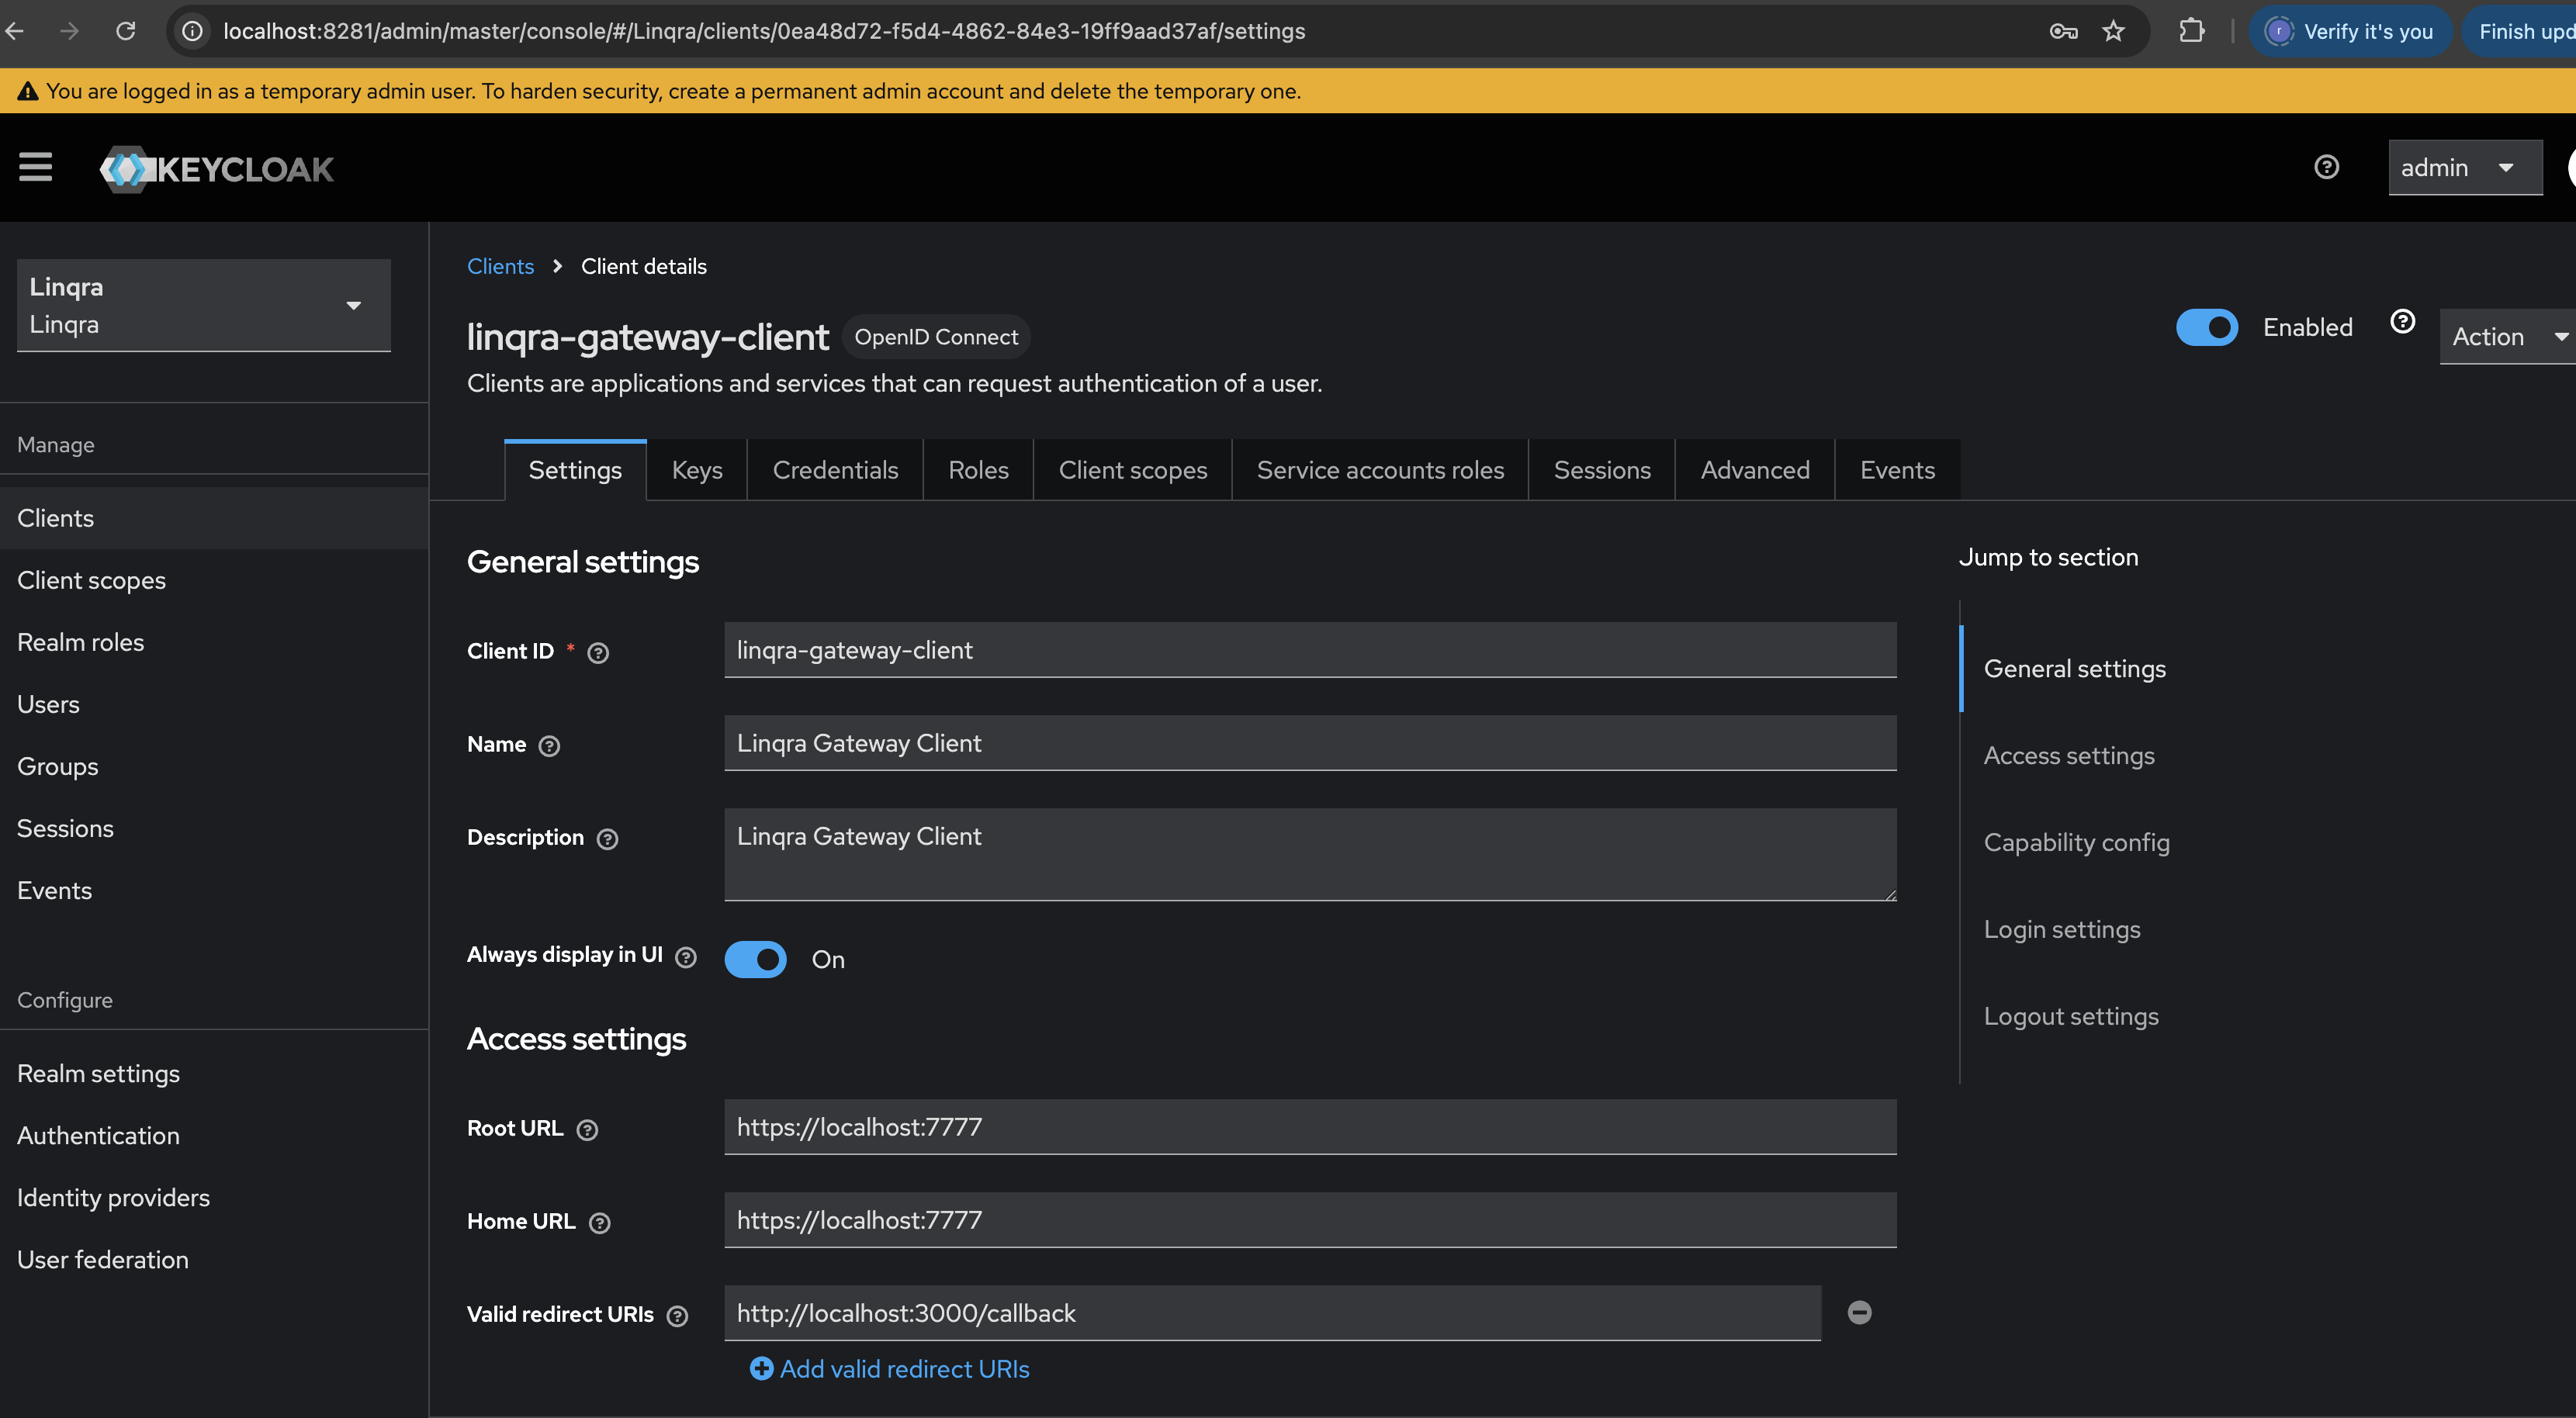 ##### Access Settings
Configure the client's access settings:
* Root URL: `https://localhost:7777`
* Home URL: `https://localhost:7777`
* Valid redirect URIs: `http://localhost:3000/callback`
* Valid post logout redirect URIs: `http://localhost:3000`
* Web origins: `http://localhost:3000`
* Admin URL: `https://localhost:7777`
##### Access Settings
Configure the client's access settings:
* Root URL: `https://localhost:7777`
* Home URL: `https://localhost:7777`
* Valid redirect URIs: `http://localhost:3000/callback`
* Valid post logout redirect URIs: `http://localhost:3000`
* Web origins: `http://localhost:3000`
* Admin URL: `https://localhost:7777`
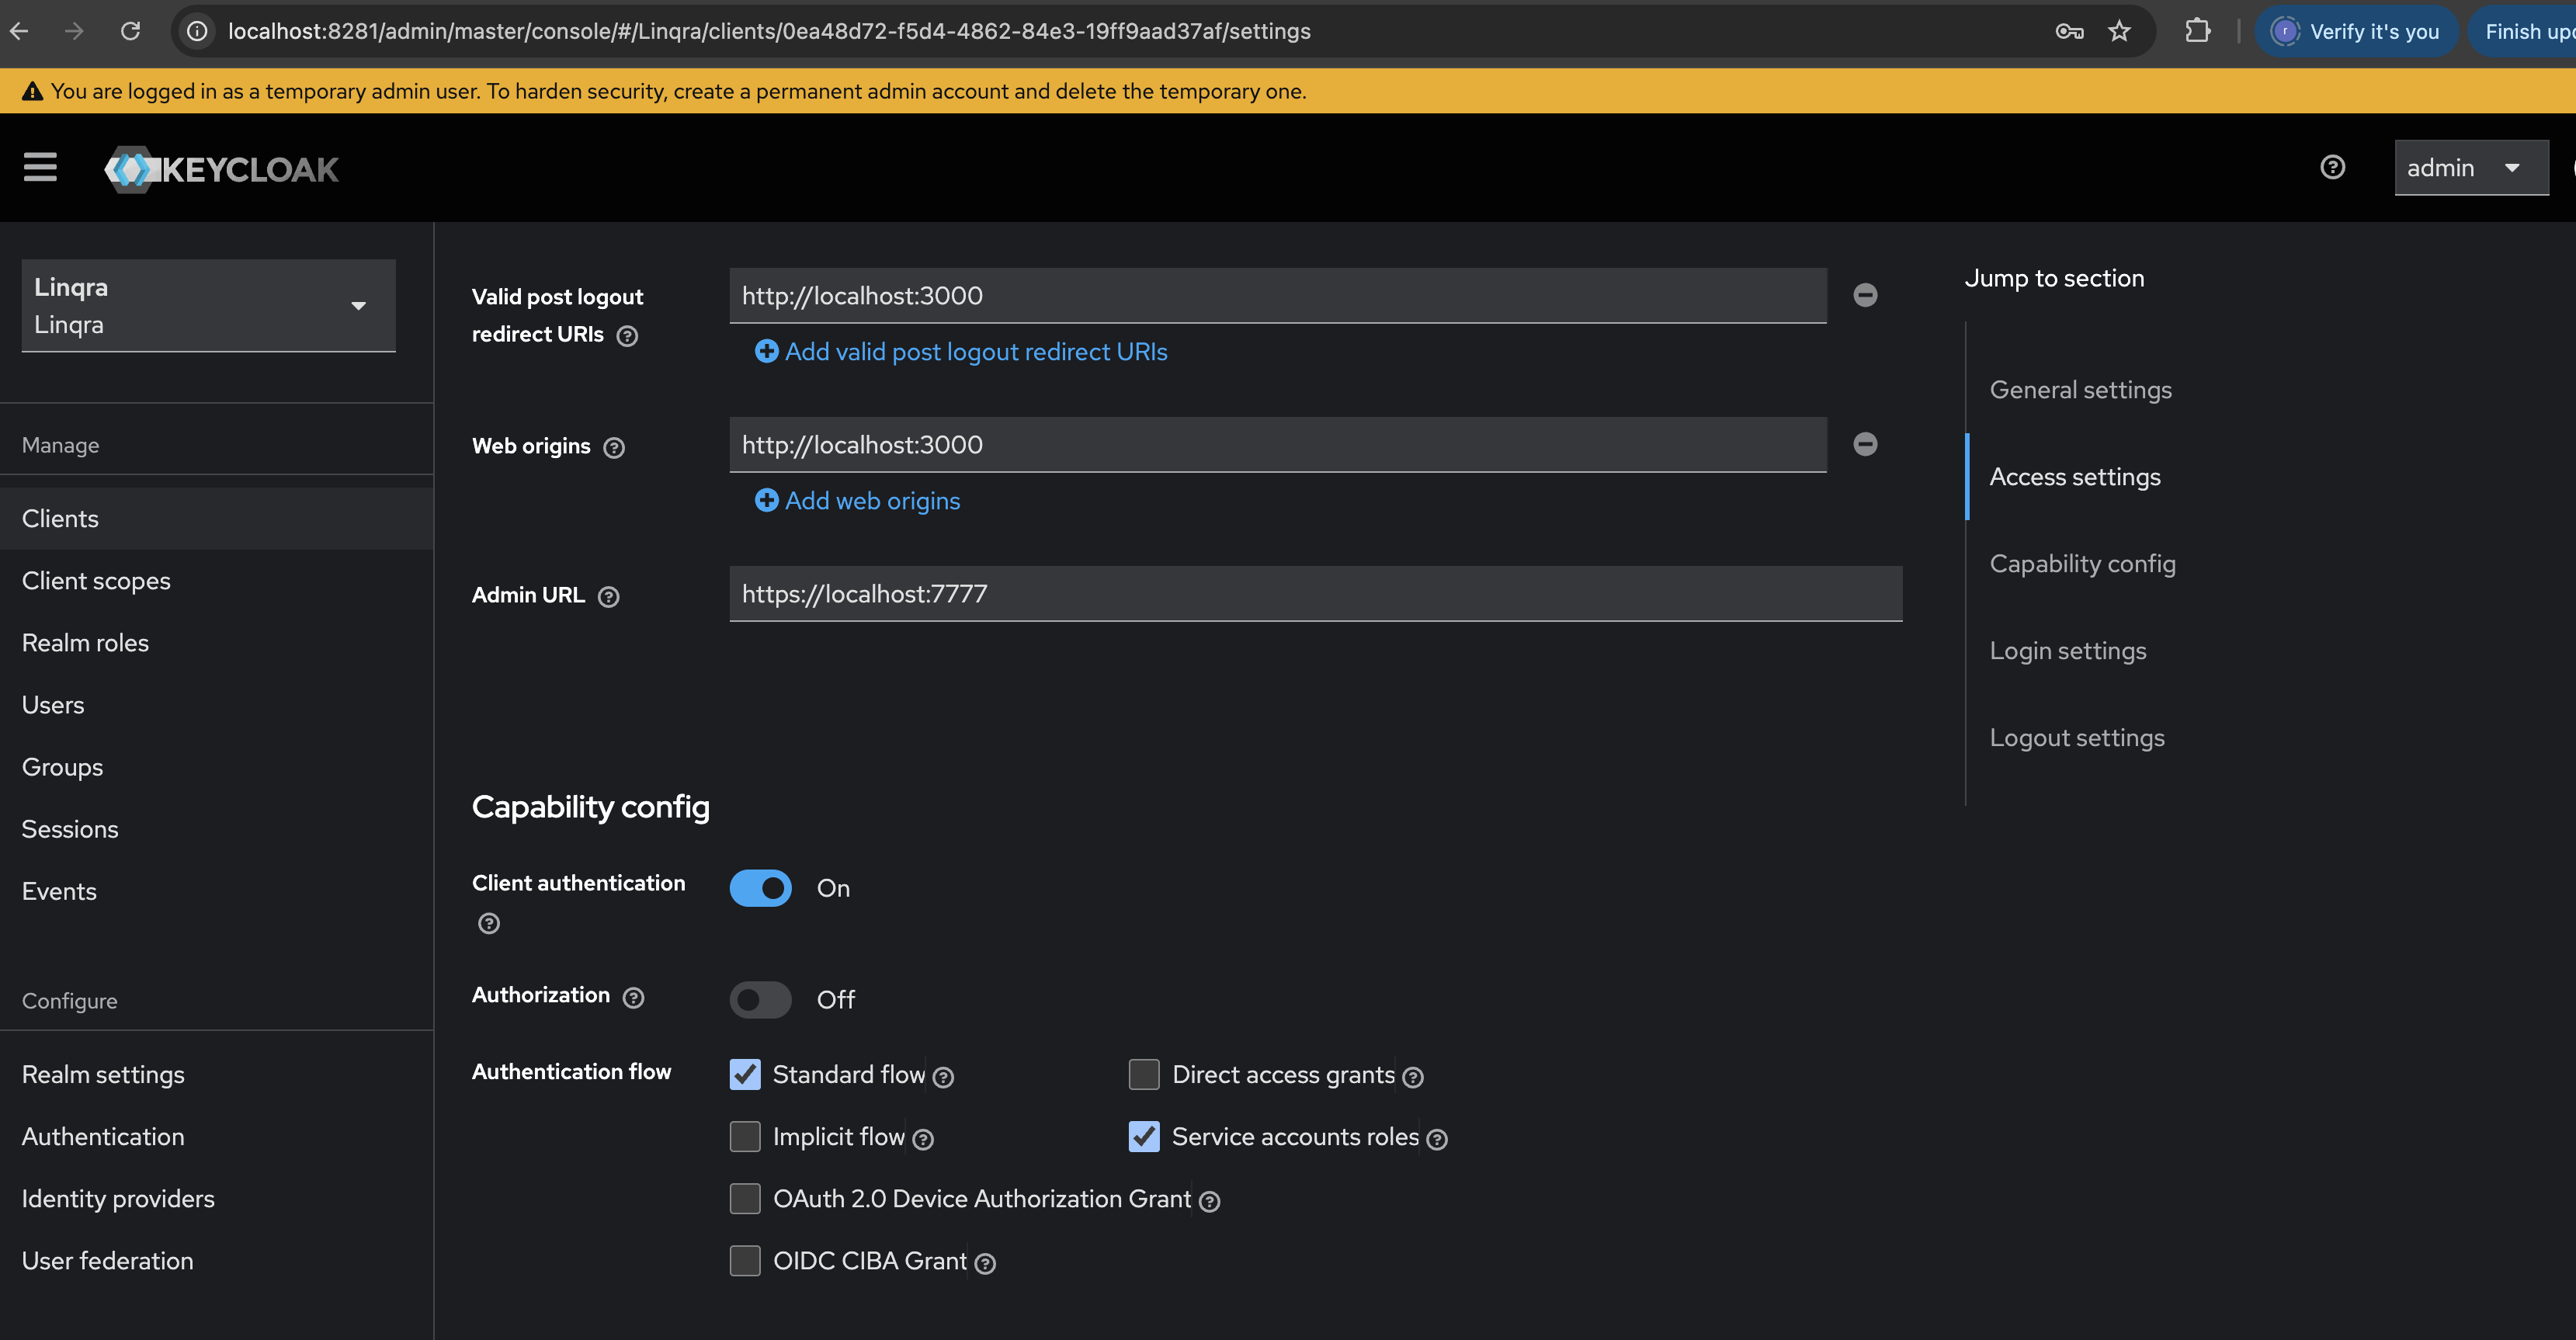 ##### Capability Config
Set up the authentication capabilities:
* Client authentication: `ON`
* Authorization: `OFF`
* Authentication flow:
* Standard flow: `Enabled`
* Service accounts roles: `Enabled`
* All other flows: `Disabled`
##### Capability Config
Set up the authentication capabilities:
* Client authentication: `ON`
* Authorization: `OFF`
* Authentication flow:
* Standard flow: `Enabled`
* Service accounts roles: `Enabled`
* All other flows: `Disabled`
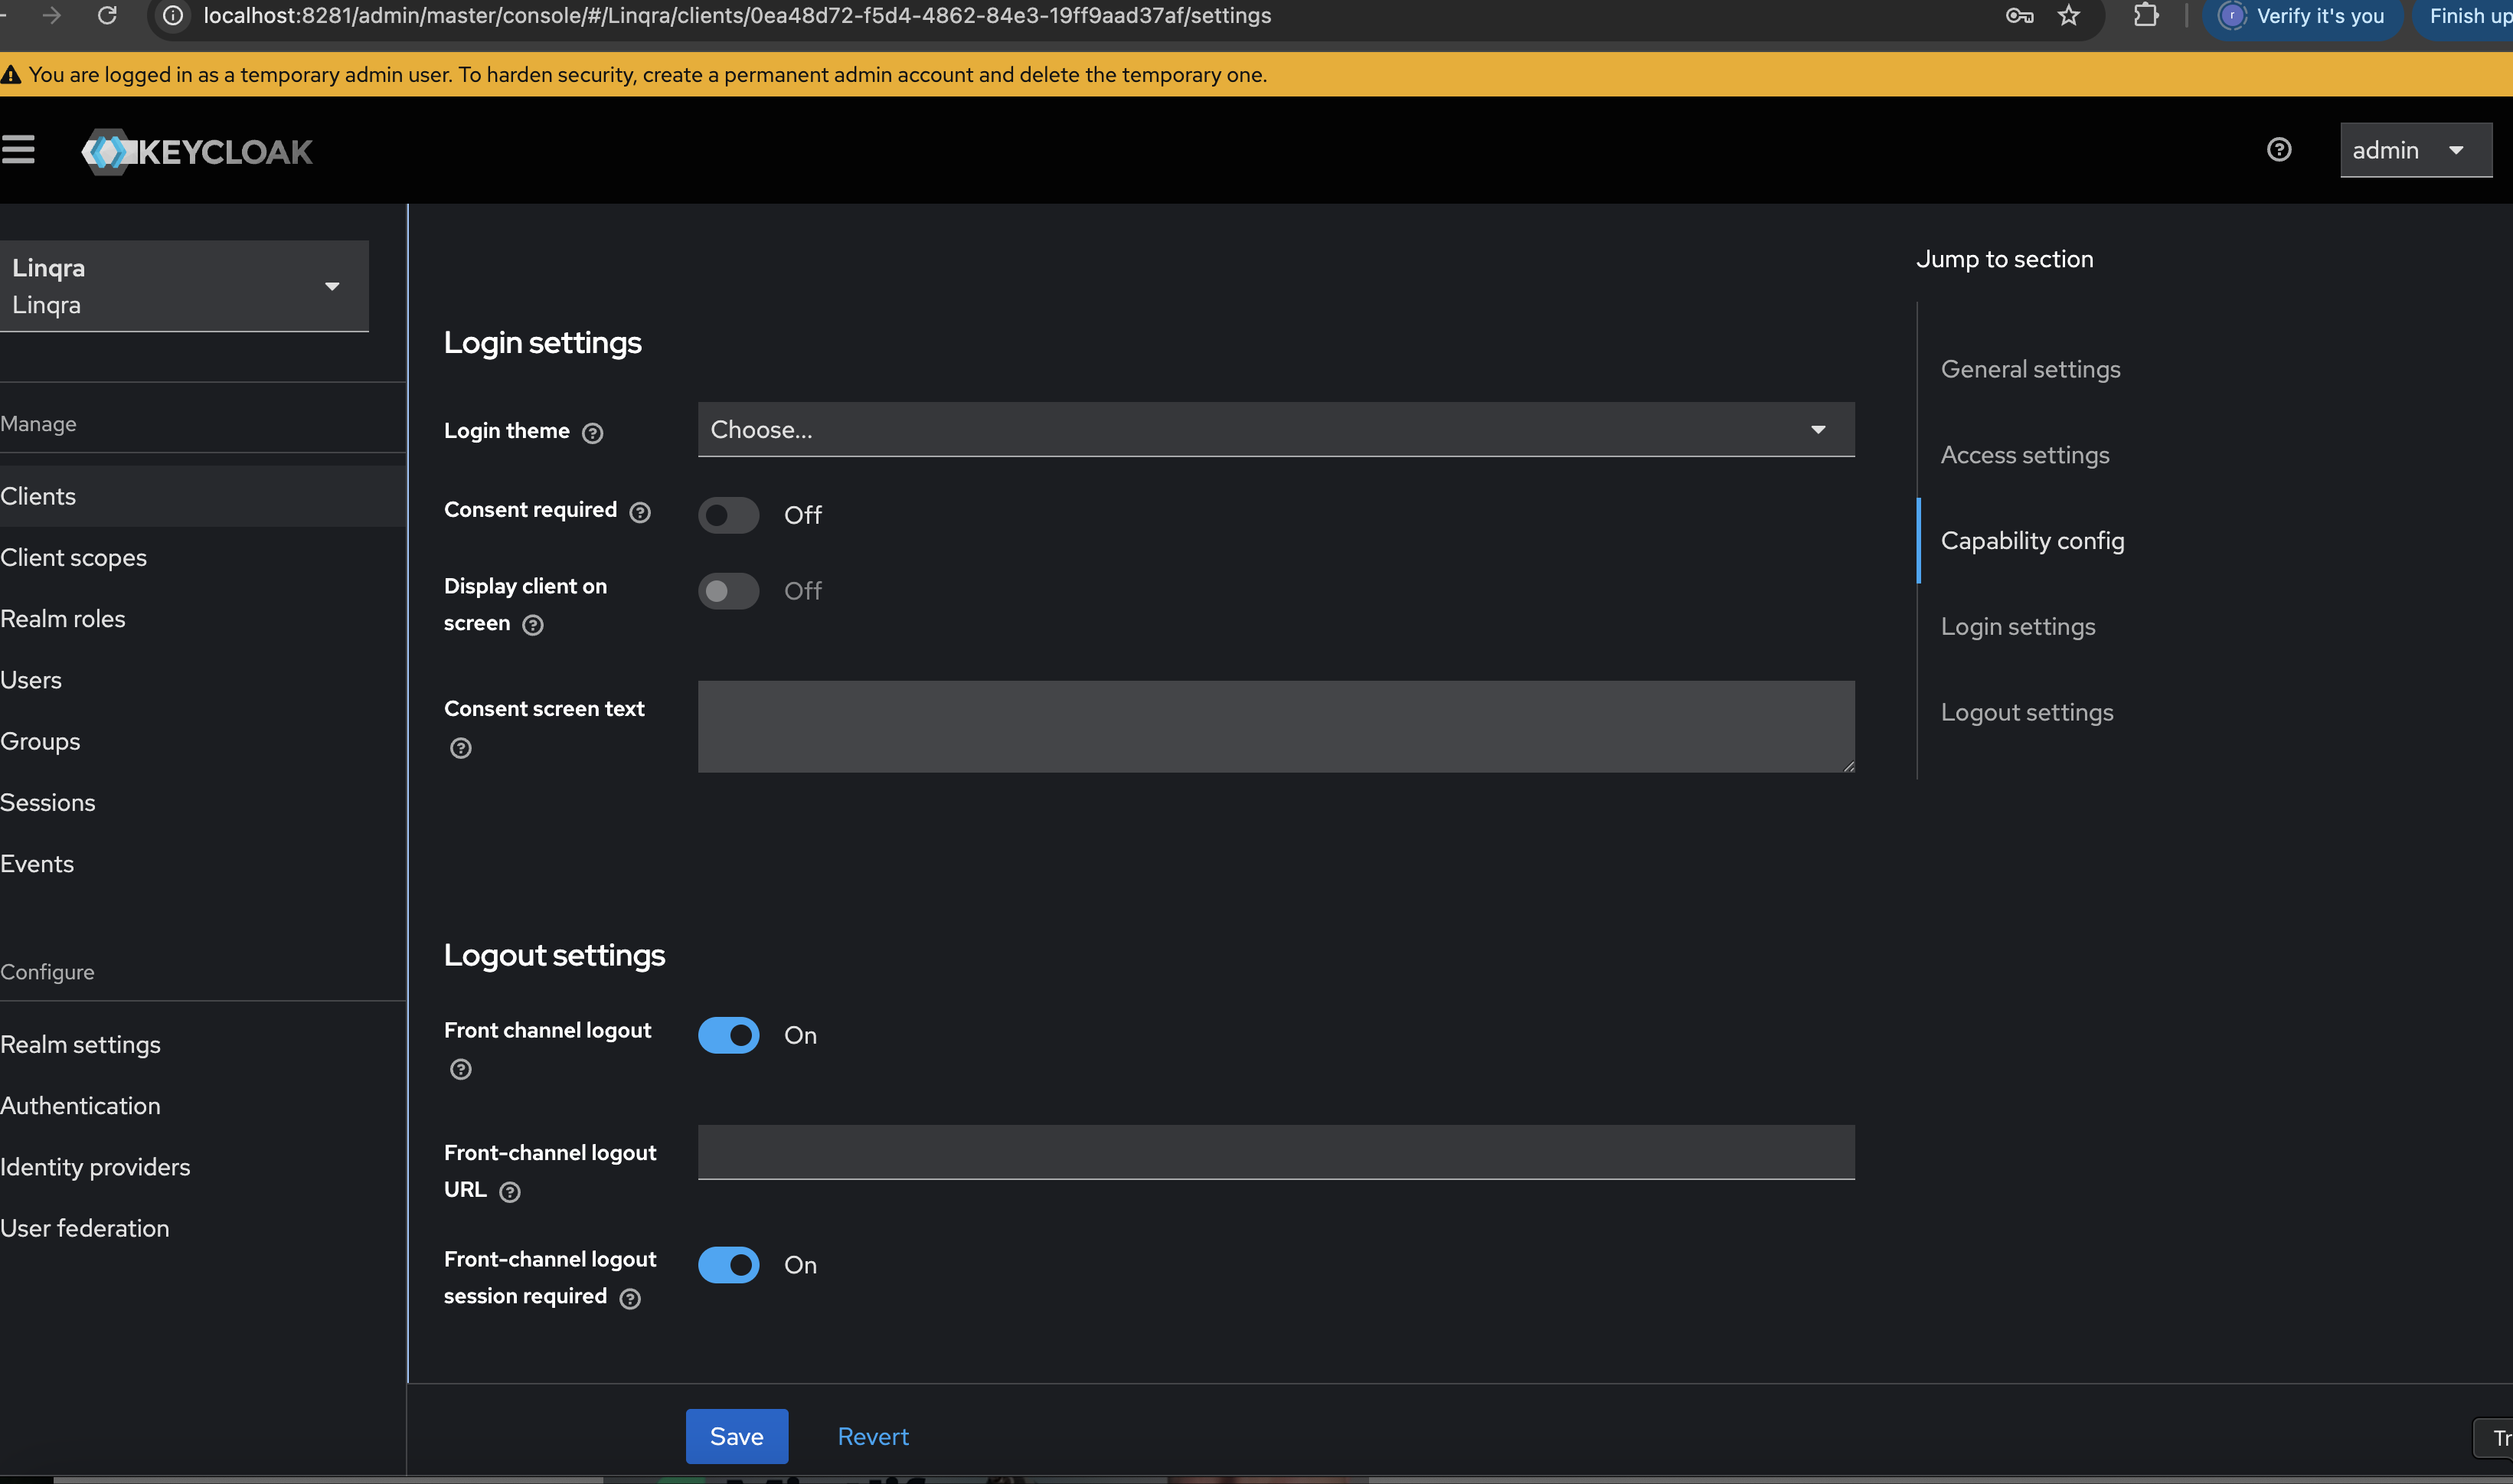 Make sure to adjust the URLs according to your deployment environment. The URLs shown here are for local development.
### 3. Create Client Role
After setting up the client, you'll need to create a role for gateway authentication:
1. Navigate to the "Roles" tab in your client settings
2. Click "Create role"
3. Configure the role:
* Role name: `gateway_admin`
* Description: `Gateway admin role for the client id: linqra-gateway-client`
4. Click "Save"
Make sure to adjust the URLs according to your deployment environment. The URLs shown here are for local development.
### 3. Create Client Role
After setting up the client, you'll need to create a role for gateway authentication:
1. Navigate to the "Roles" tab in your client settings
2. Click "Create role"
3. Configure the role:
* Role name: `gateway_admin`
* Description: `Gateway admin role for the client id: linqra-gateway-client`
4. Click "Save"
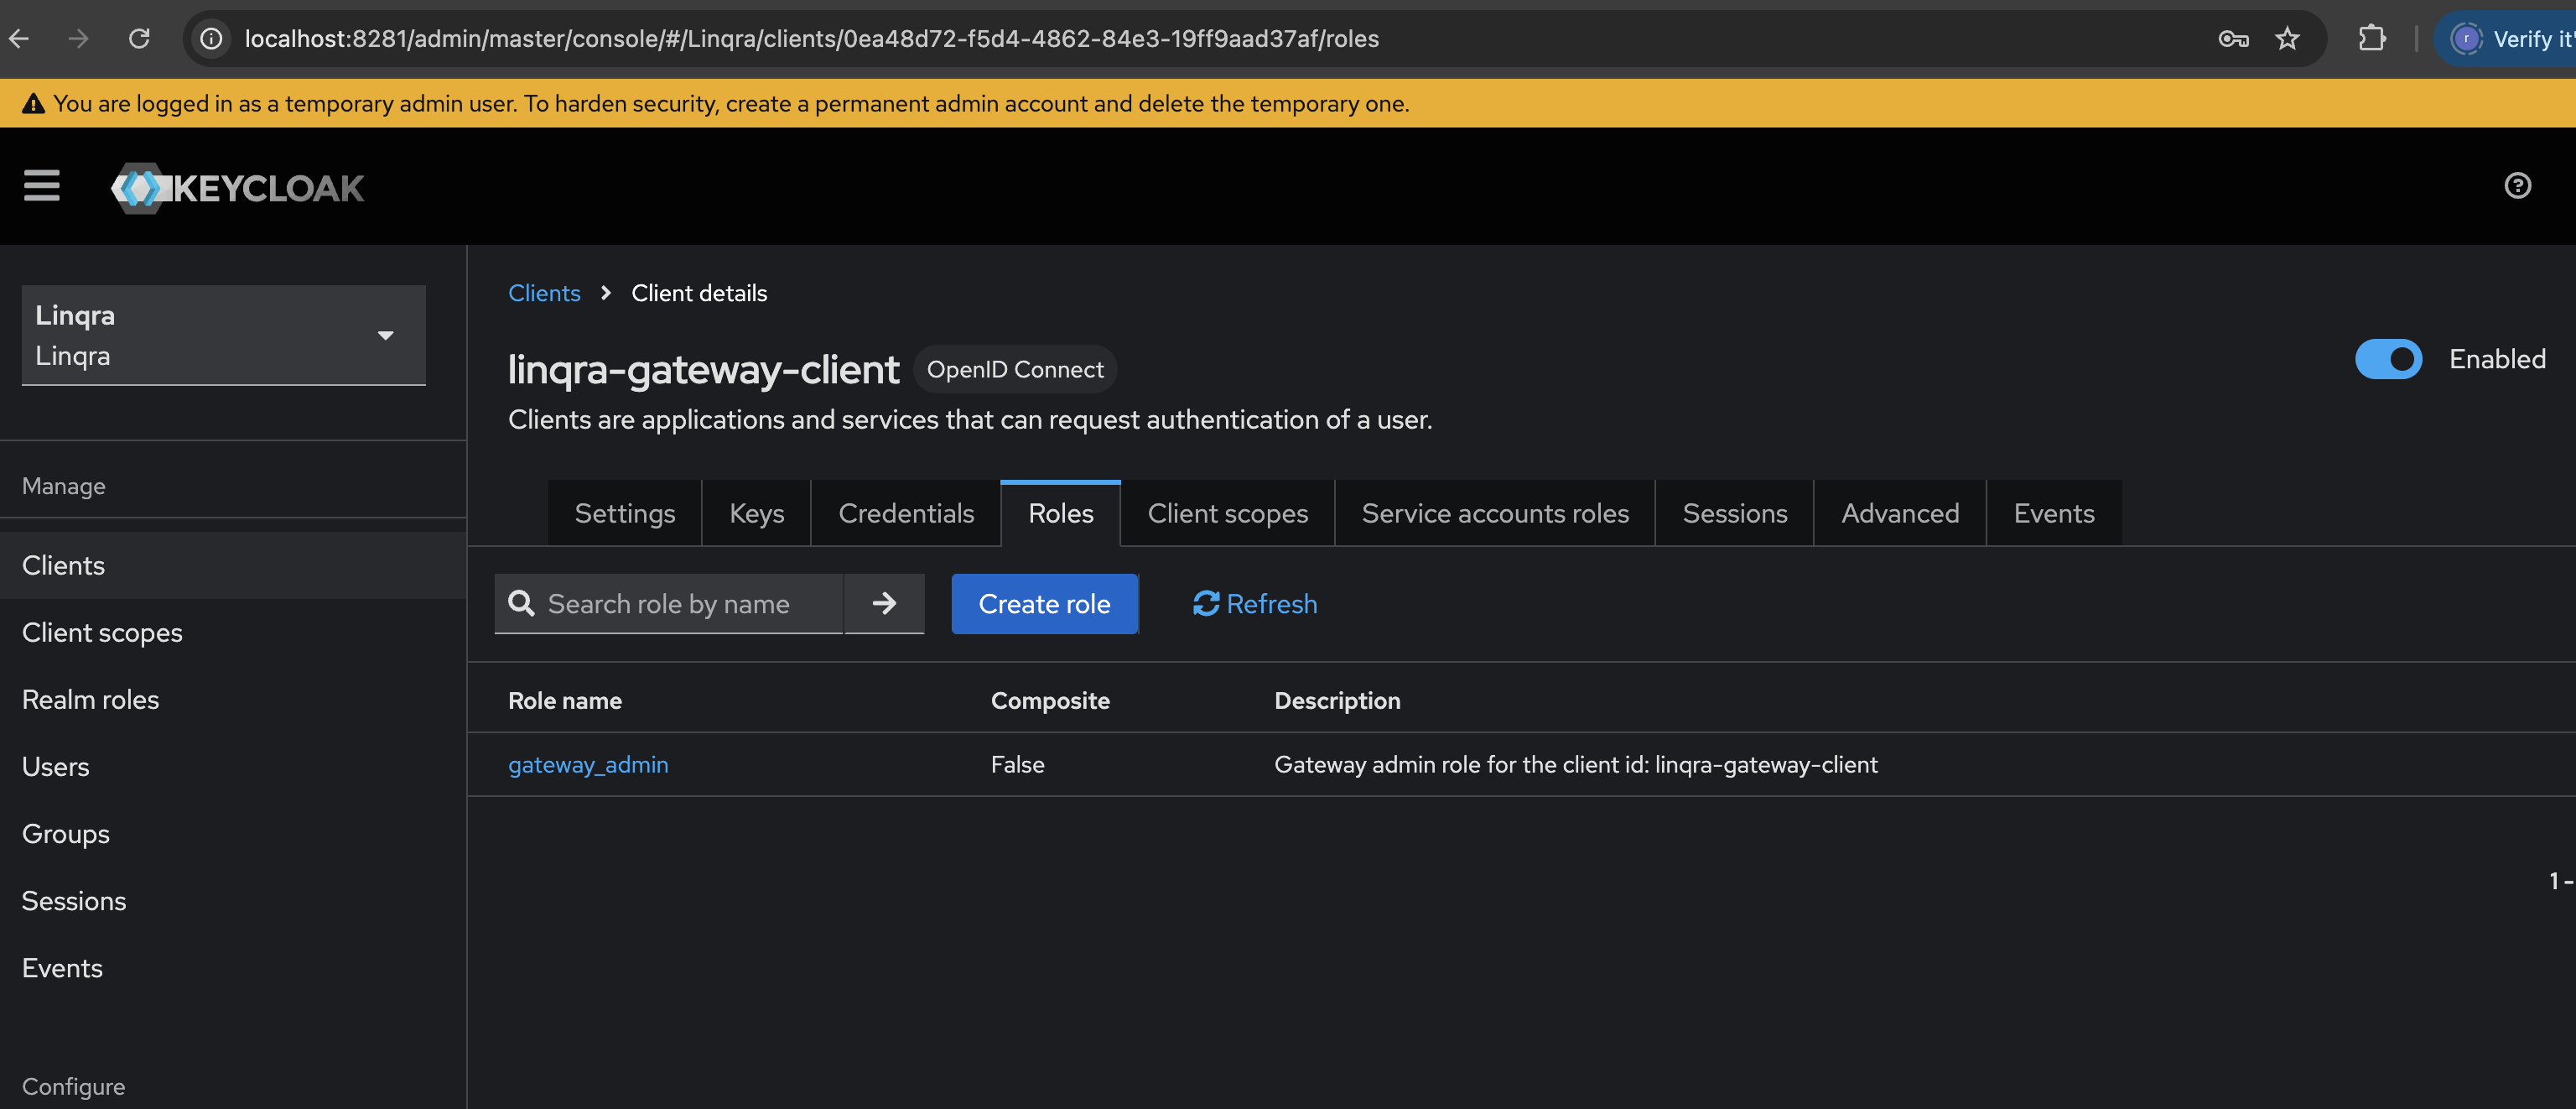 The `gateway_admin` role is used by the API Gateway's security system to verify that requests are coming from a valid Linqra Gateway application. This is a system-level role for application authentication, not for user administration.
### 4. Create Realm Role
Next, you'll need to create a realm-level role to identify Linqra realm belongings:
1. Navigate to "Realm roles" in the left sidebar
2. Click "Create role"
3. Configure the role:
* Role name: `gateway_admin_realm`
* Description: `Role to identify the belongings of the Linqra realm`
4. Click "Save"
The `gateway_admin` role is used by the API Gateway's security system to verify that requests are coming from a valid Linqra Gateway application. This is a system-level role for application authentication, not for user administration.
### 4. Create Realm Role
Next, you'll need to create a realm-level role to identify Linqra realm belongings:
1. Navigate to "Realm roles" in the left sidebar
2. Click "Create role"
3. Configure the role:
* Role name: `gateway_admin_realm`
* Description: `Role to identify the belongings of the Linqra realm`
4. Click "Save"
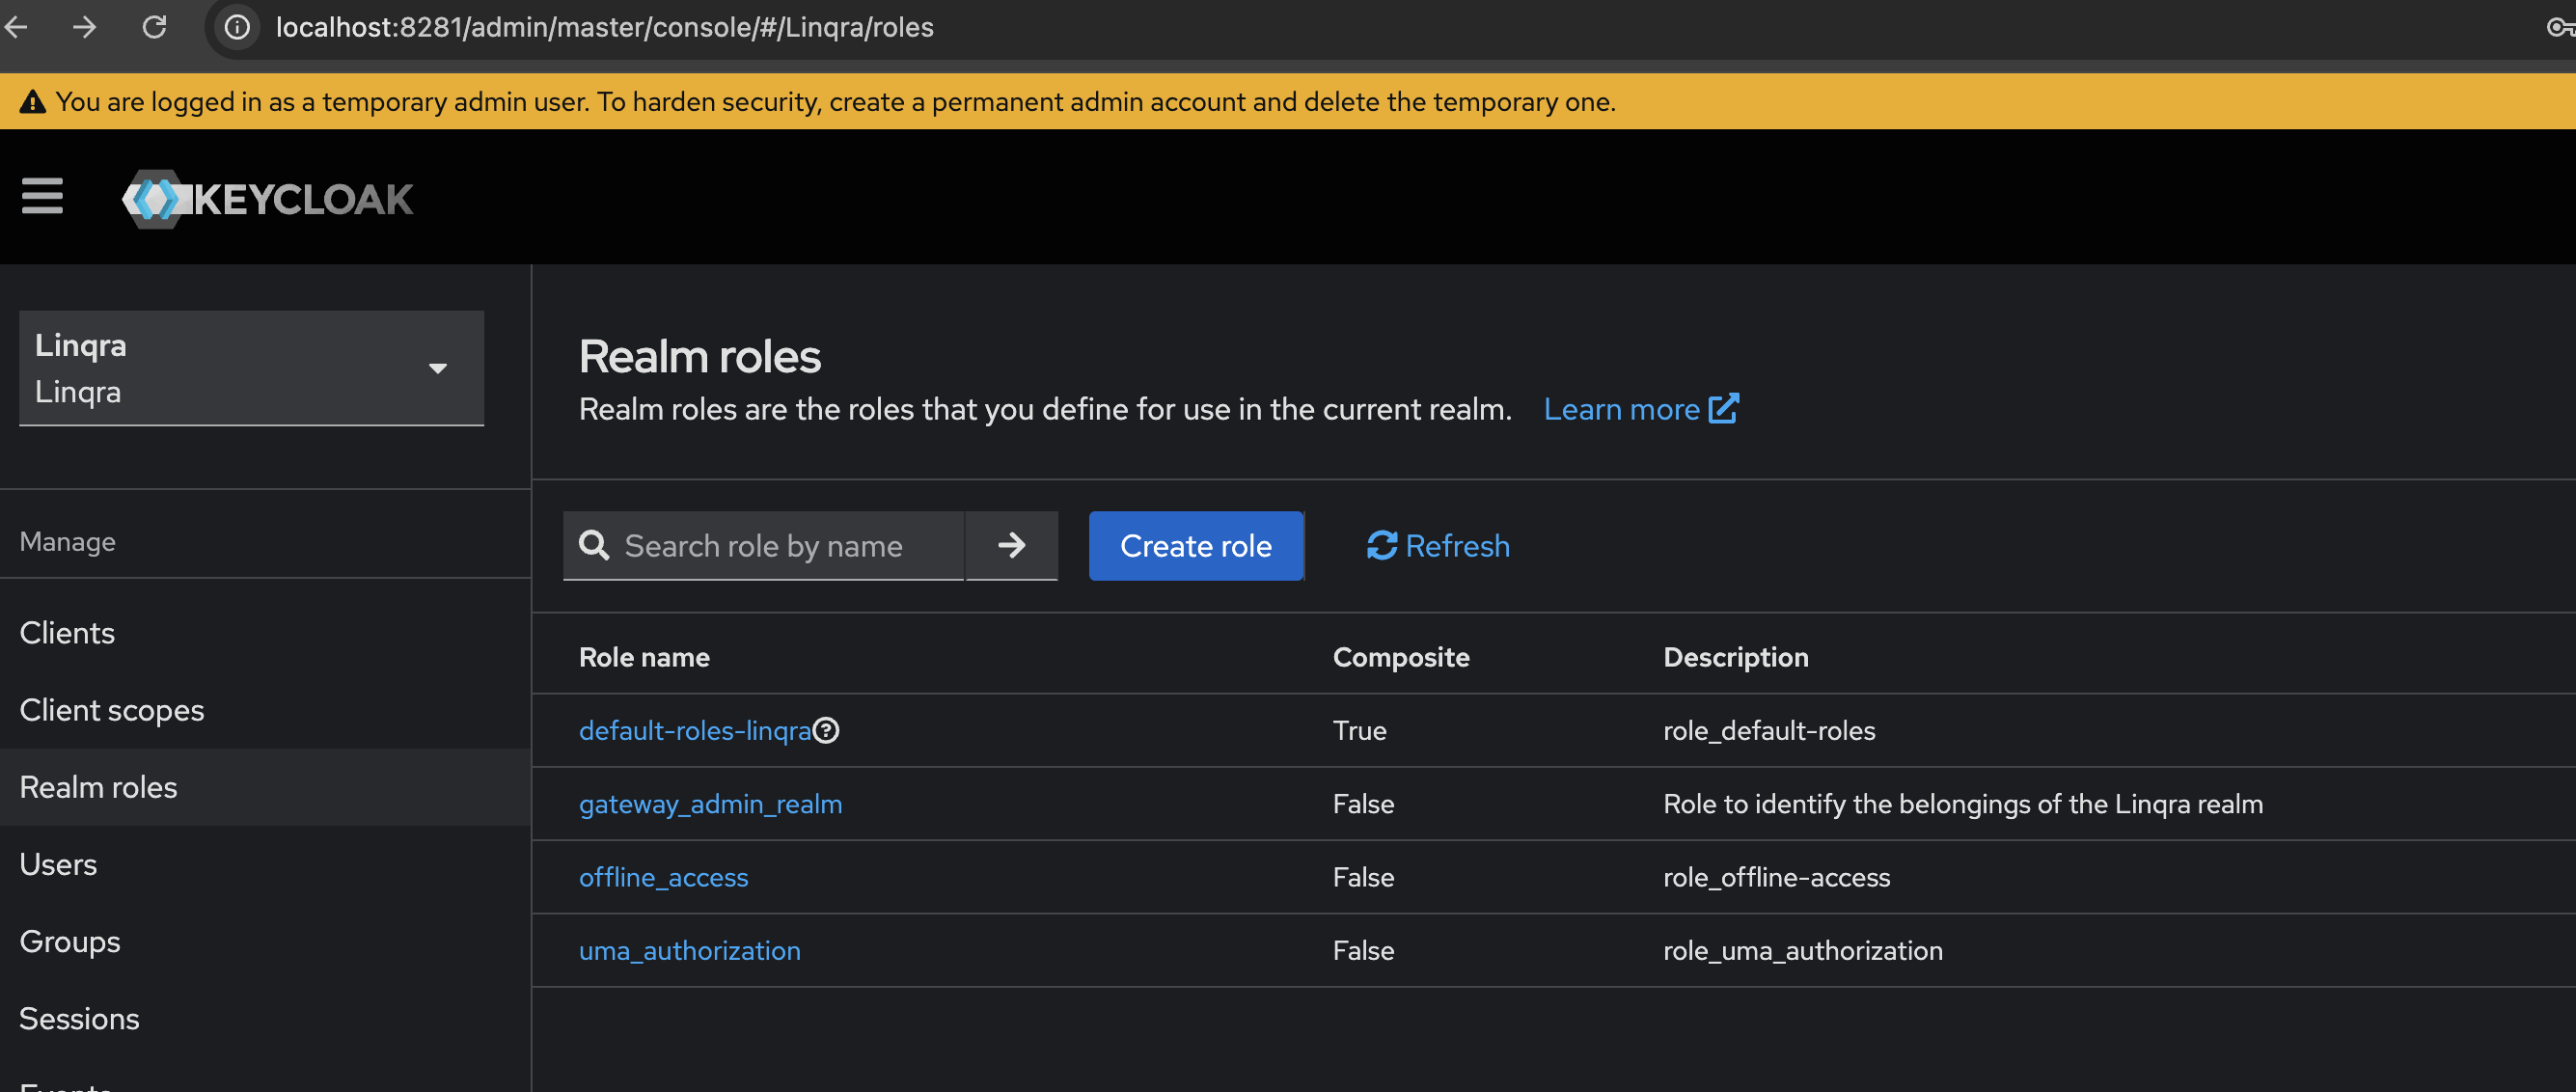 The `gateway_admin_realm` role is used at the realm level to identify and manage resources that belong to the Linqra realm. This is distinct from the client-specific `gateway_admin` role created earlier.
### 5. Assign Service Account Roles
Now you need to assign both the client and realm roles to the service account:
1. Navigate to your client's "Service accounts roles" tab
2. You'll see the service account username: `service-account-linqra-gateway-client`
3. Assign the roles:
First, assign the client role:
* Click "Assign role"
* Select "Filter by client" and choose "linqra-gateway-client"
* Select `gateway_admin`
* Click "Assign"
Then, assign the realm role:
* Click "Assign role" again
* Select "Filter by realm roles"
* Select `gateway_admin_realm`
* Click "Assign"
The `gateway_admin_realm` role is used at the realm level to identify and manage resources that belong to the Linqra realm. This is distinct from the client-specific `gateway_admin` role created earlier.
### 5. Assign Service Account Roles
Now you need to assign both the client and realm roles to the service account:
1. Navigate to your client's "Service accounts roles" tab
2. You'll see the service account username: `service-account-linqra-gateway-client`
3. Assign the roles:
First, assign the client role:
* Click "Assign role"
* Select "Filter by client" and choose "linqra-gateway-client"
* Select `gateway_admin`
* Click "Assign"
Then, assign the realm role:
* Click "Assign role" again
* Select "Filter by realm roles"
* Select `gateway_admin_realm`
* Click "Assign"
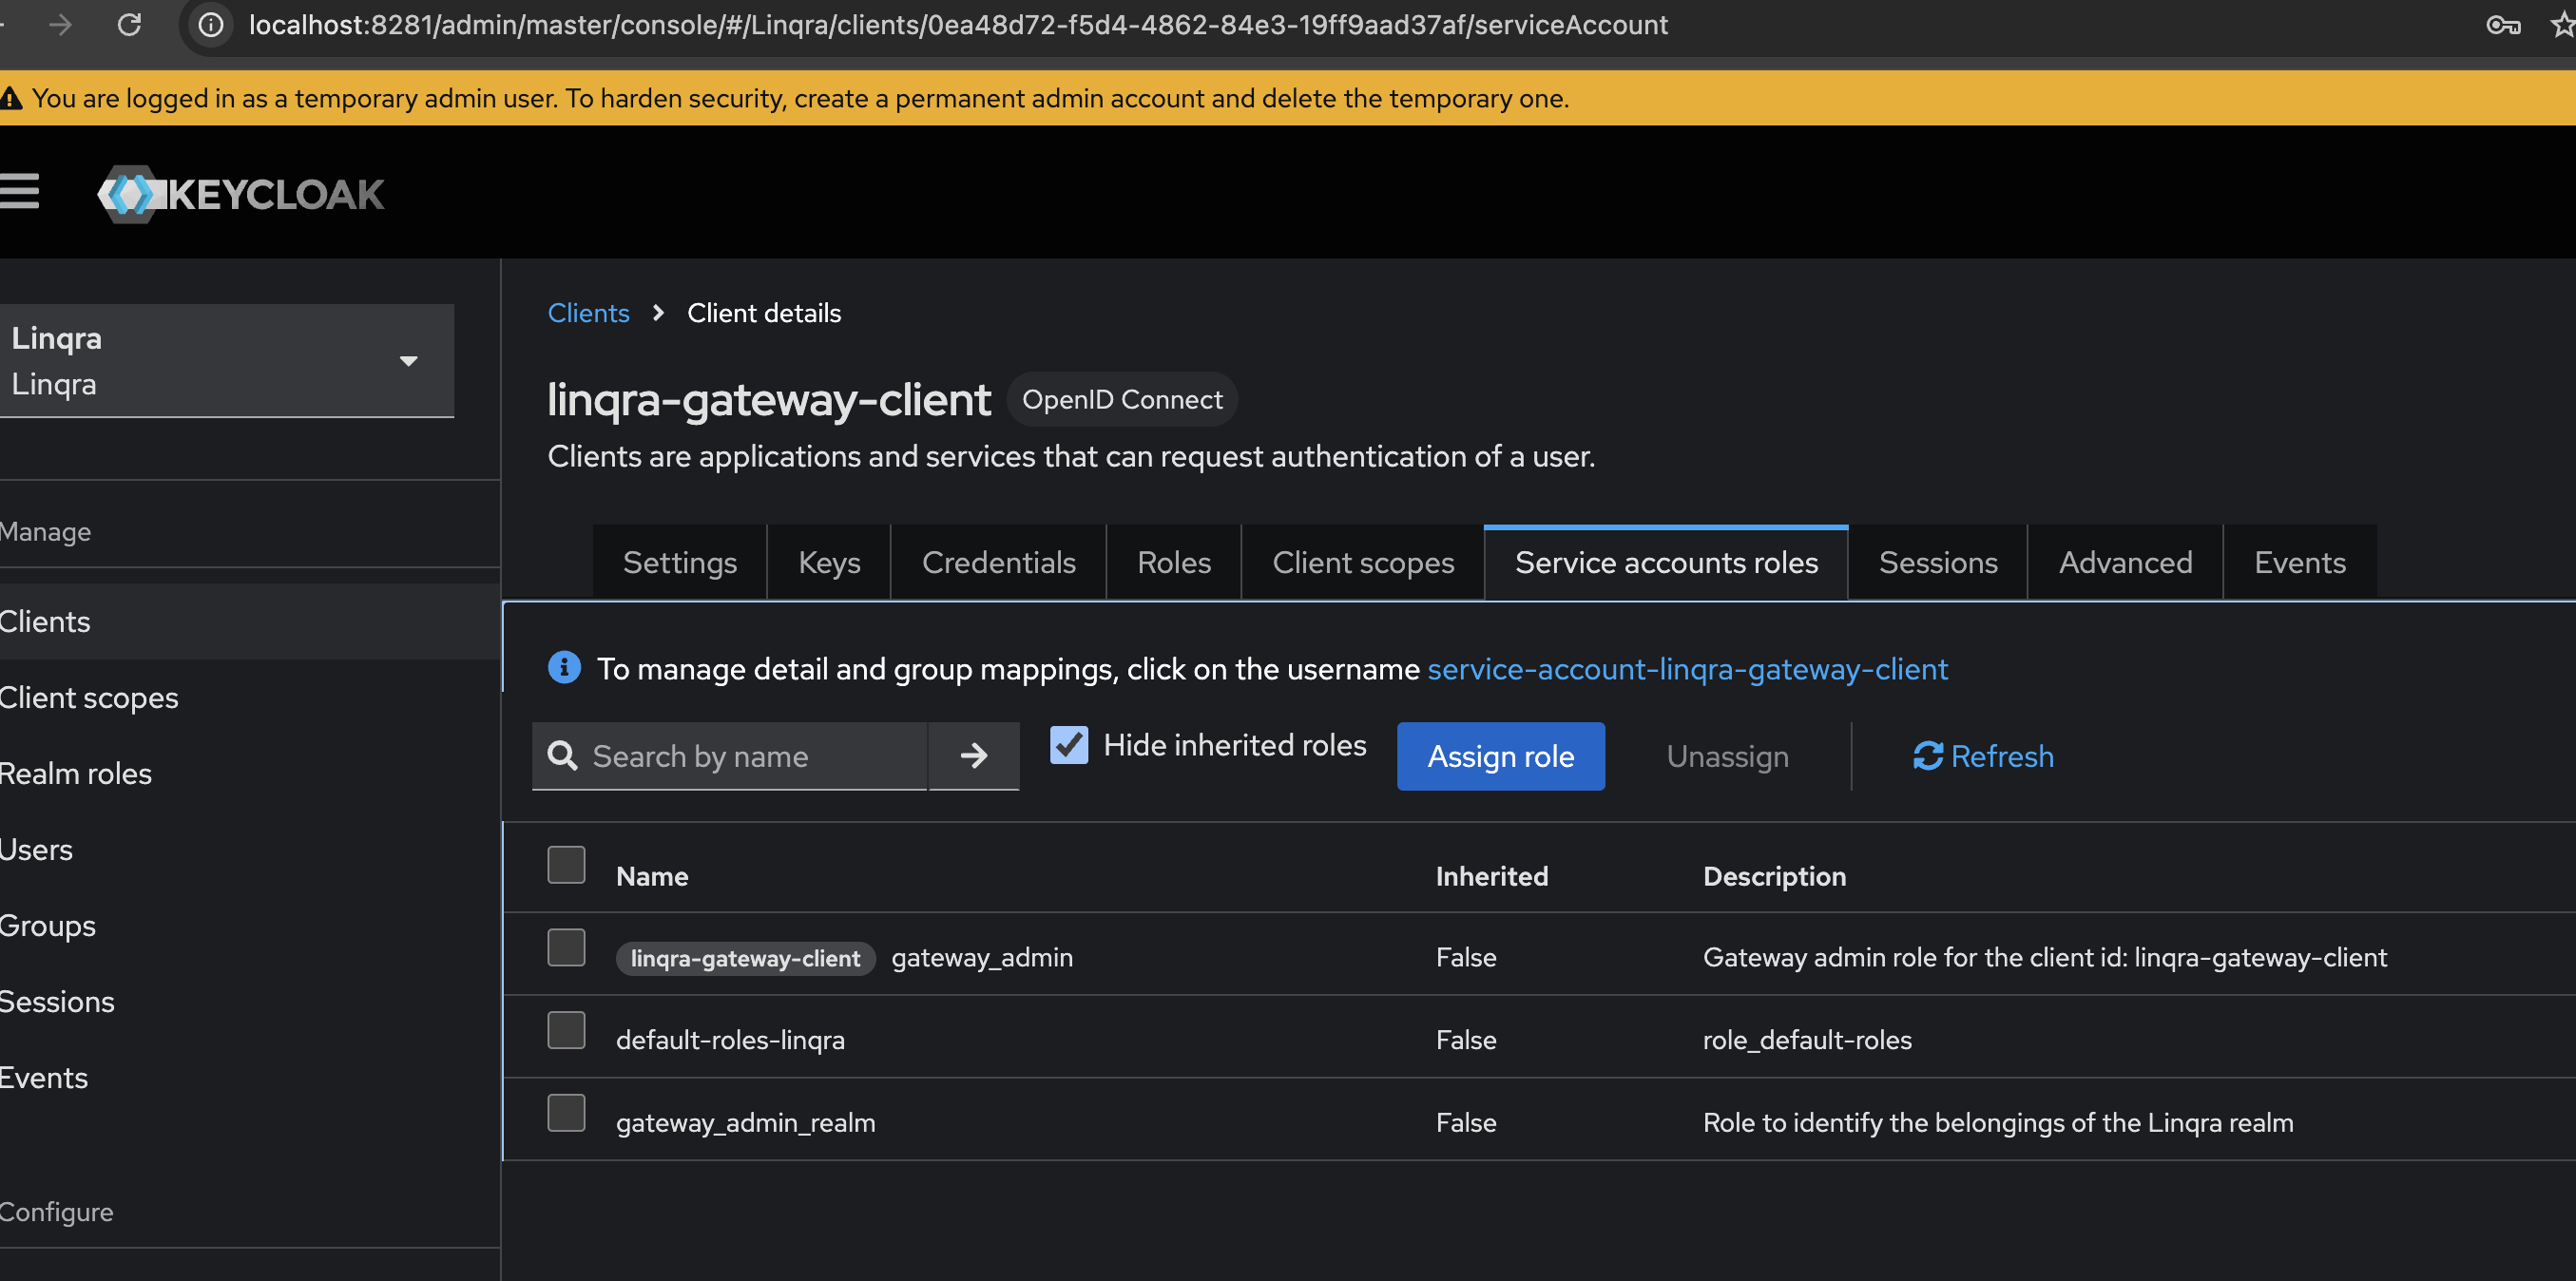 The service account needs both roles to function properly:
* `gateway_admin`: For client-level authentication
* `gateway_admin_realm`: For realm-level resource access
Make sure to assign both roles as they are essential for the gateway's proper operation. Missing role assignments can lead to authentication failures.
### 6. Create Client Scopes
Next, create the necessary client scopes for gateway and team-based access control.
#### a. Gateway Read Scope
1. Navigate to "Client scopes" in the left sidebar
2. Click "Create client scope"
3. Configure the scope:
* Name: `gateway.read`
* Description: `To read the gateway end points`
* Type: `Default`
* Display on consent screen: `ON`
* Include in token scope: `ON`
4. Click "Save"
The service account needs both roles to function properly:
* `gateway_admin`: For client-level authentication
* `gateway_admin_realm`: For realm-level resource access
Make sure to assign both roles as they are essential for the gateway's proper operation. Missing role assignments can lead to authentication failures.
### 6. Create Client Scopes
Next, create the necessary client scopes for gateway and team-based access control.
#### a. Gateway Read Scope
1. Navigate to "Client scopes" in the left sidebar
2. Click "Create client scope"
3. Configure the scope:
* Name: `gateway.read`
* Description: `To read the gateway end points`
* Type: `Default`
* Display on consent screen: `ON`
* Include in token scope: `ON`
4. Click "Save"
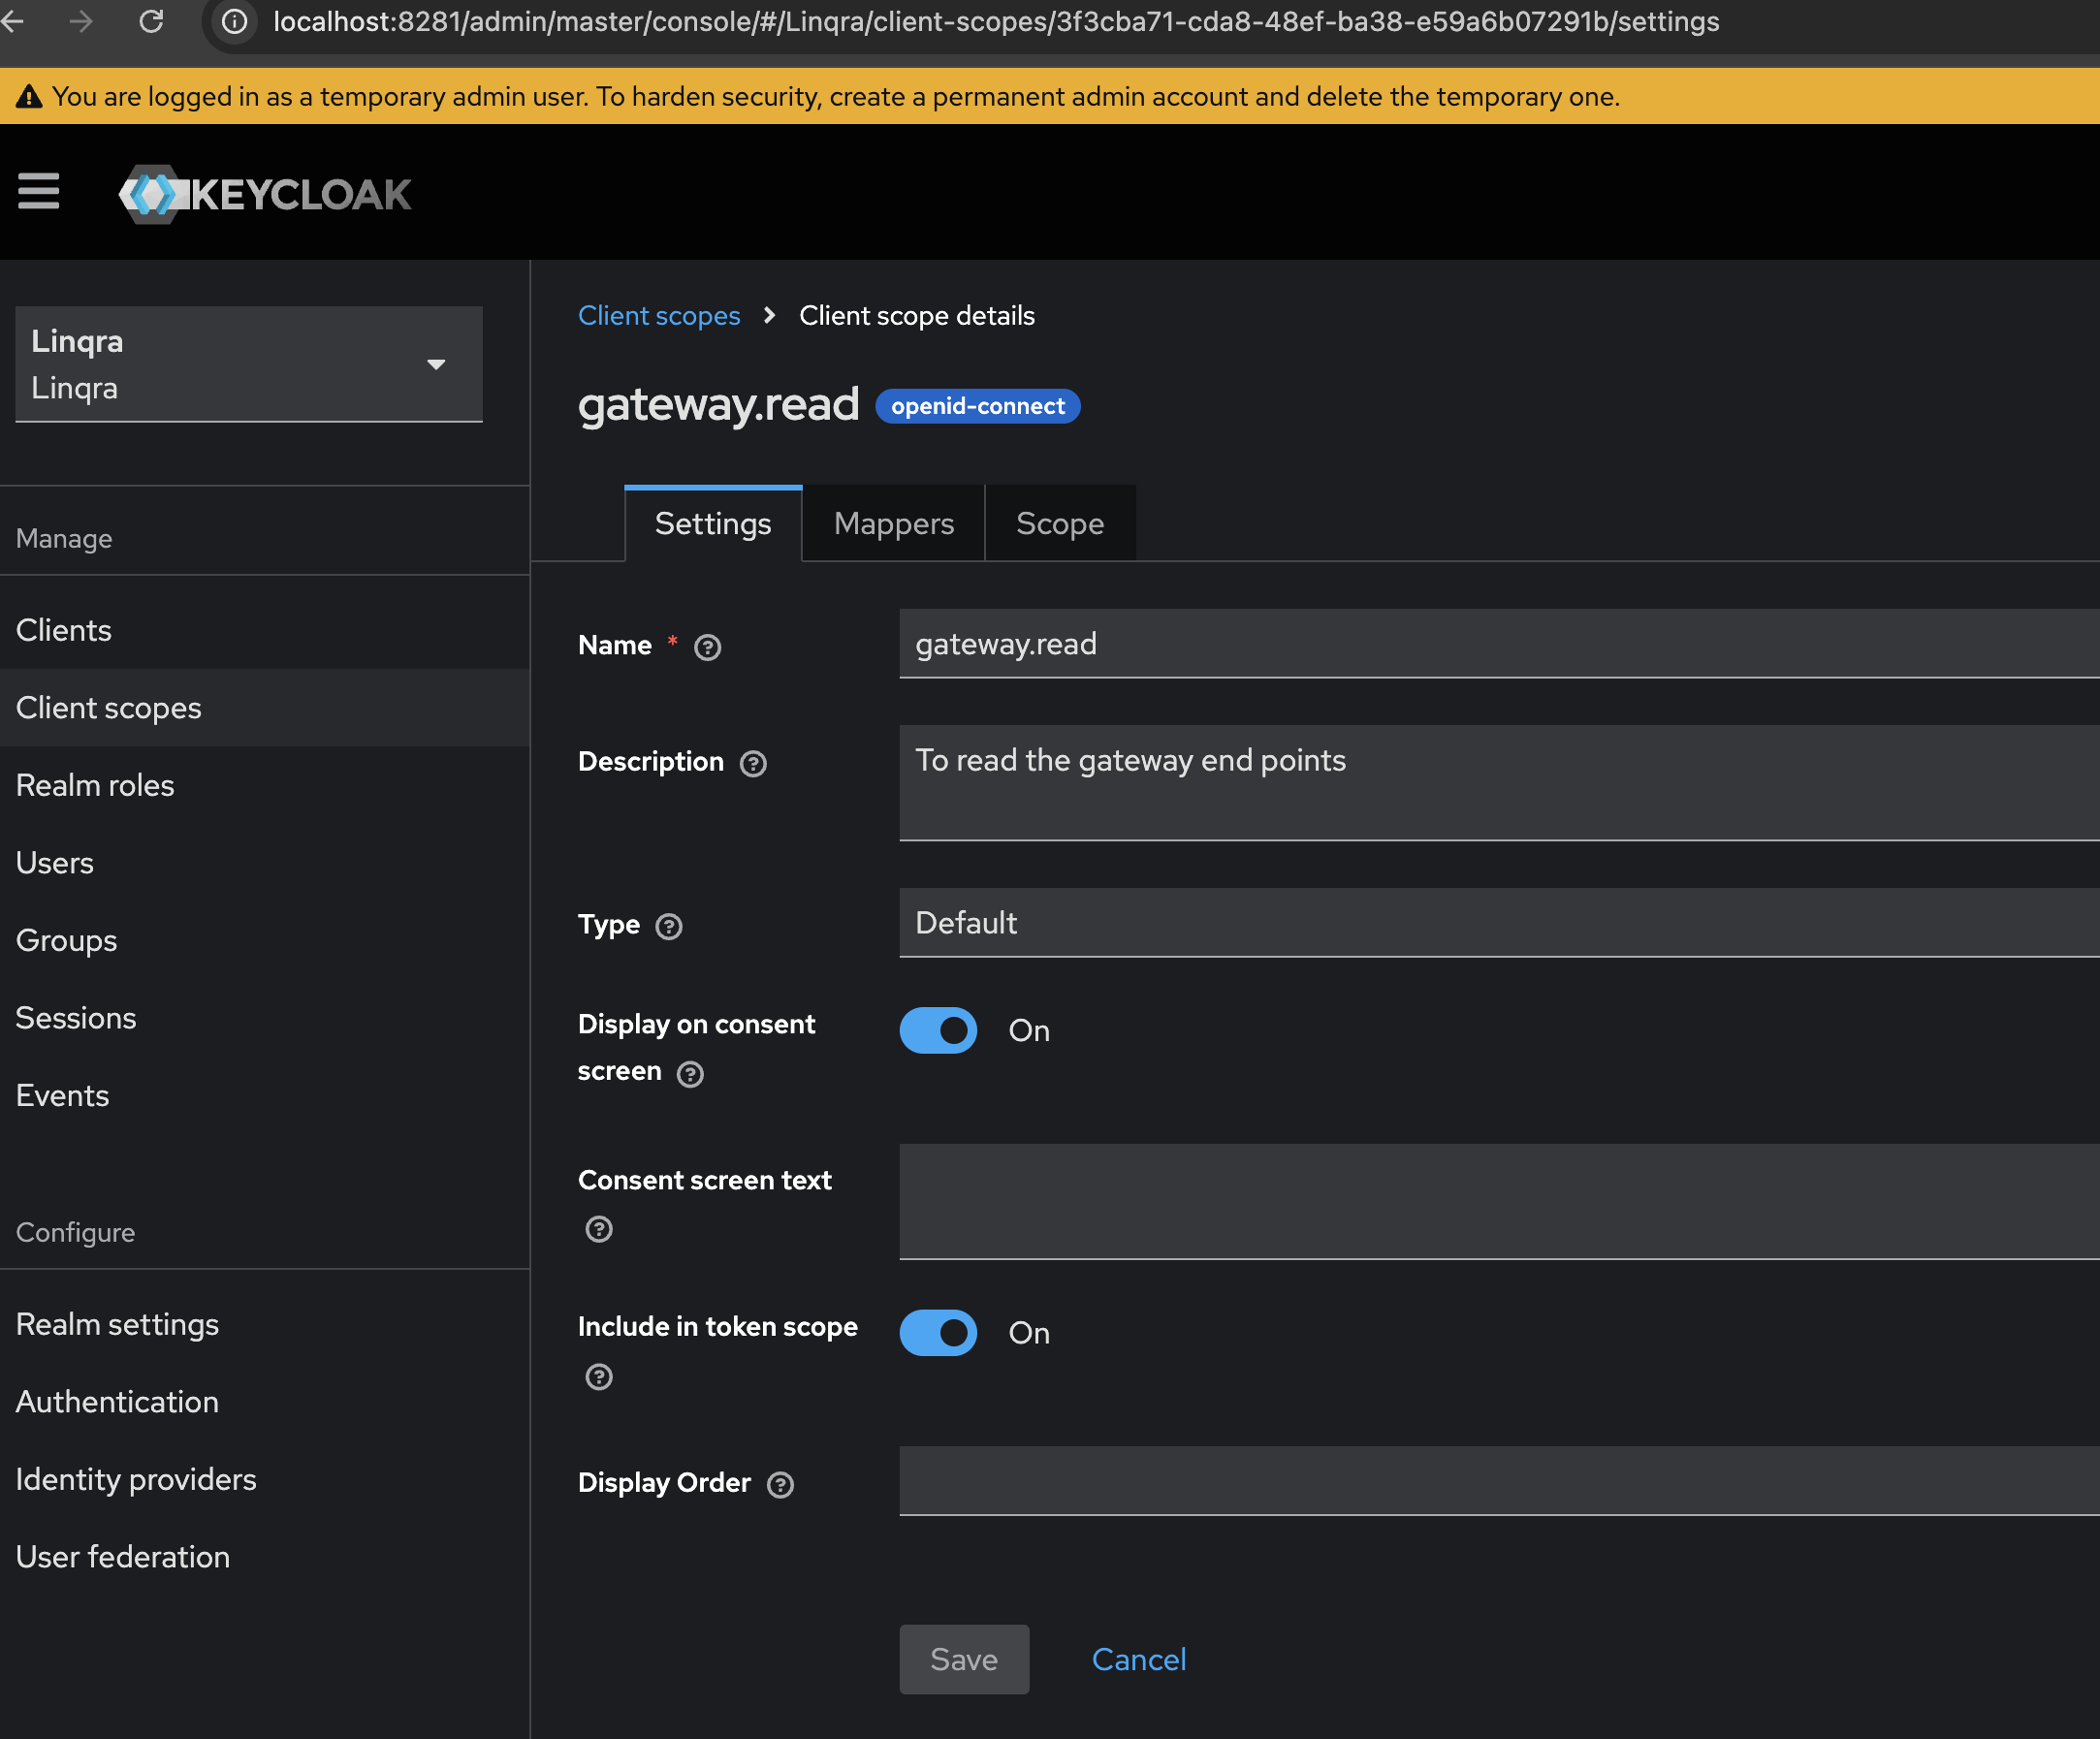 Client scopes help in defining sets of protocol mappers and role scope mappings that can be shared between multiple clients. The `gateway.read` scope provides the necessary permissions for reading gateway endpoints.
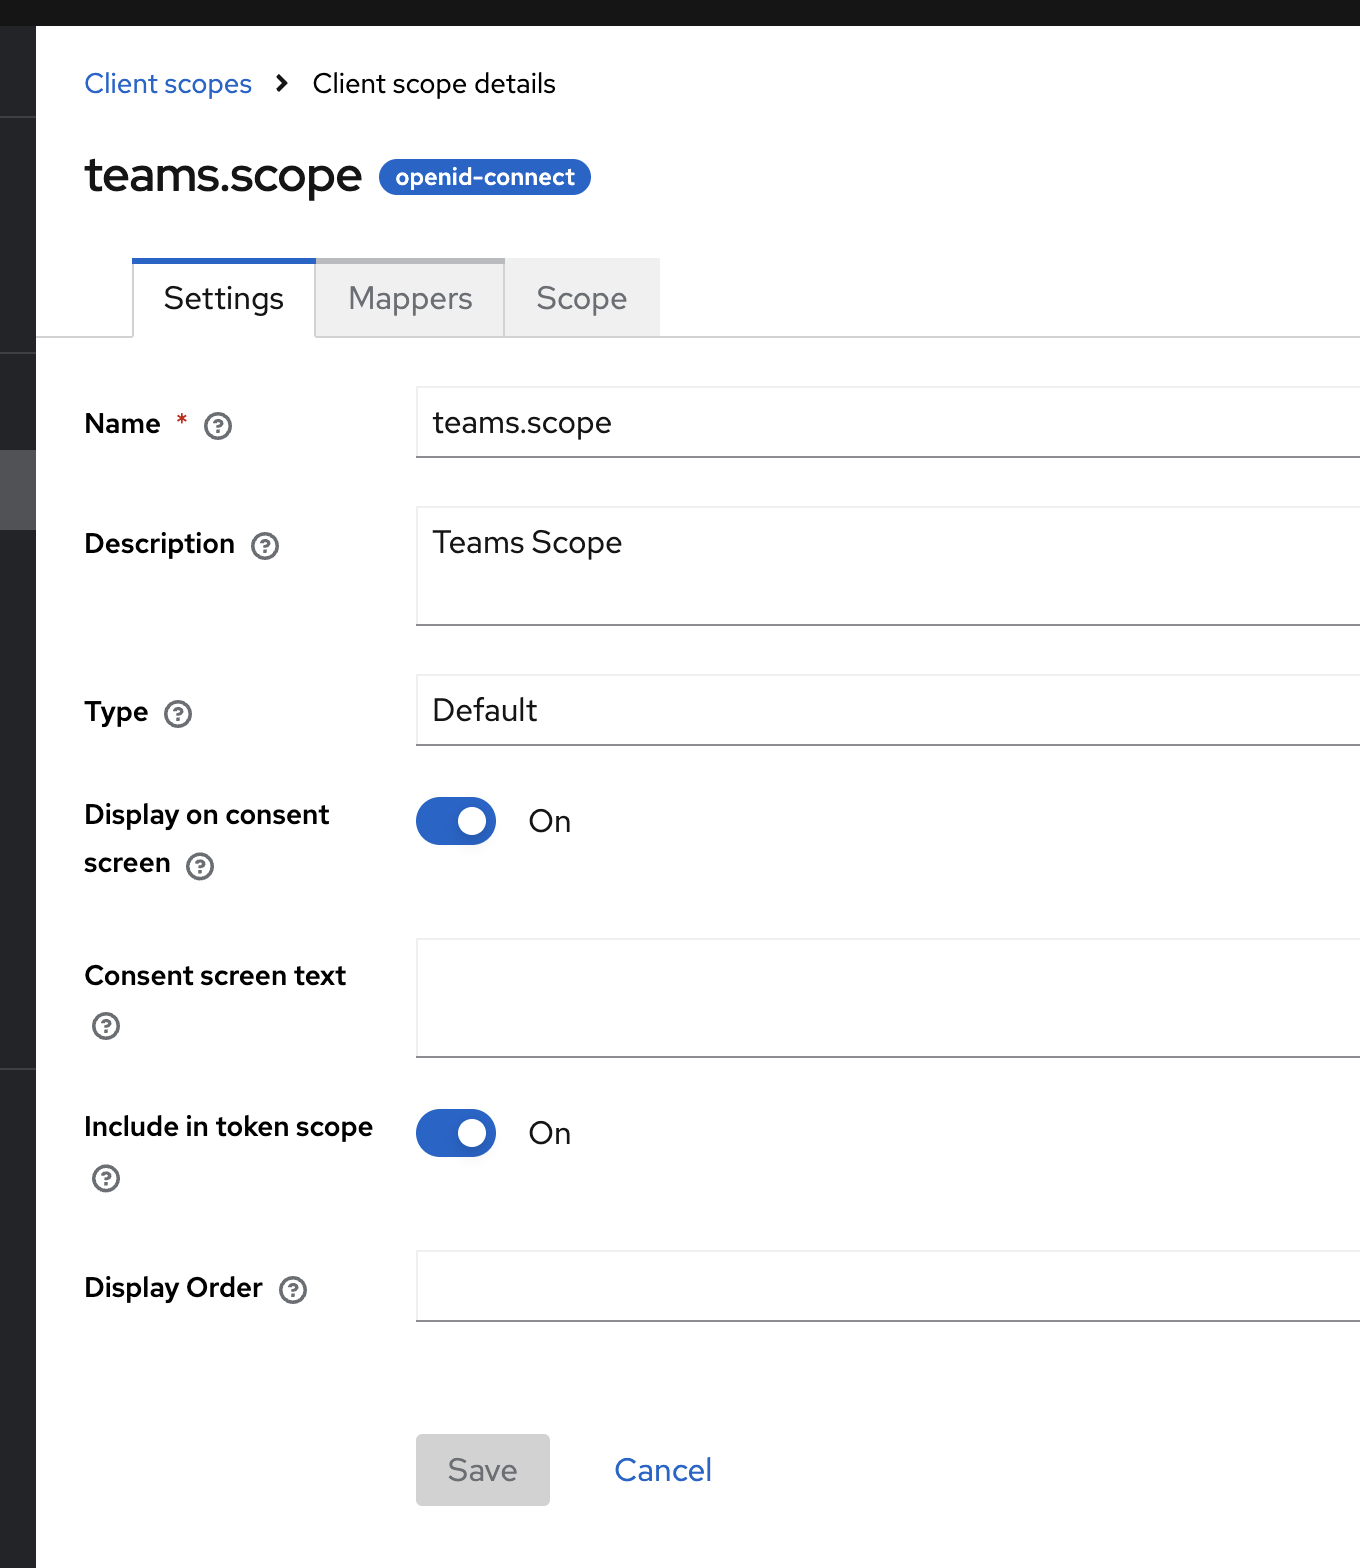
#### b. Team Scope
1. In the "Client scopes" section, click "Create client scope" again.
2. Configure the scope:
* Name: `team.scope`
* Description: `Restricts access to specific teams`
* Type: `Default`
* Display on consent screen: `ON`
* Include in token scope: `ON`
3. Click "Save"
Client scopes help in defining sets of protocol mappers and role scope mappings that can be shared between multiple clients. The `gateway.read` scope provides the necessary permissions for reading gateway endpoints.
#### b. Team Scope
1. In the "Client scopes" section, click "Create client scope" again.
2. Configure the scope:
* Name: `team.scope`
* Description: `Restricts access to specific teams`
* Type: `Default`
* Display on consent screen: `ON`
* Include in token scope: `ON`
3. Click "Save"
 Now, add a hardcoded claim mapper to this scope:
1. Go to the `team.scope` client scope you just created.
2. Navigate to the "Mappers" tab.
3. Click "Create" to add a new mapper.
4. Configure the mapper:
* Name: `teams`
* Category: `Token mapper`
* Mapper Type: `Hardcoded claim`
* Claim name: `teams`
* Claim value: `["67d0aeb17172416c411d419e"]`
* Claim JSON type: `JSON`
* Add to ID token: `ON`
* Add to access token: `ON`
* Add to userinfo: `ON`
5. Click "Save"
Now, add a hardcoded claim mapper to this scope:
1. Go to the `team.scope` client scope you just created.
2. Navigate to the "Mappers" tab.
3. Click "Create" to add a new mapper.
4. Configure the mapper:
* Name: `teams`
* Category: `Token mapper`
* Mapper Type: `Hardcoded claim`
* Claim name: `teams`
* Claim value: `["67d0aeb17172416c411d419e"]`
* Claim JSON type: `JSON`
* Add to ID token: `ON`
* Add to access token: `ON`
* Add to userinfo: `ON`
5. Click "Save"
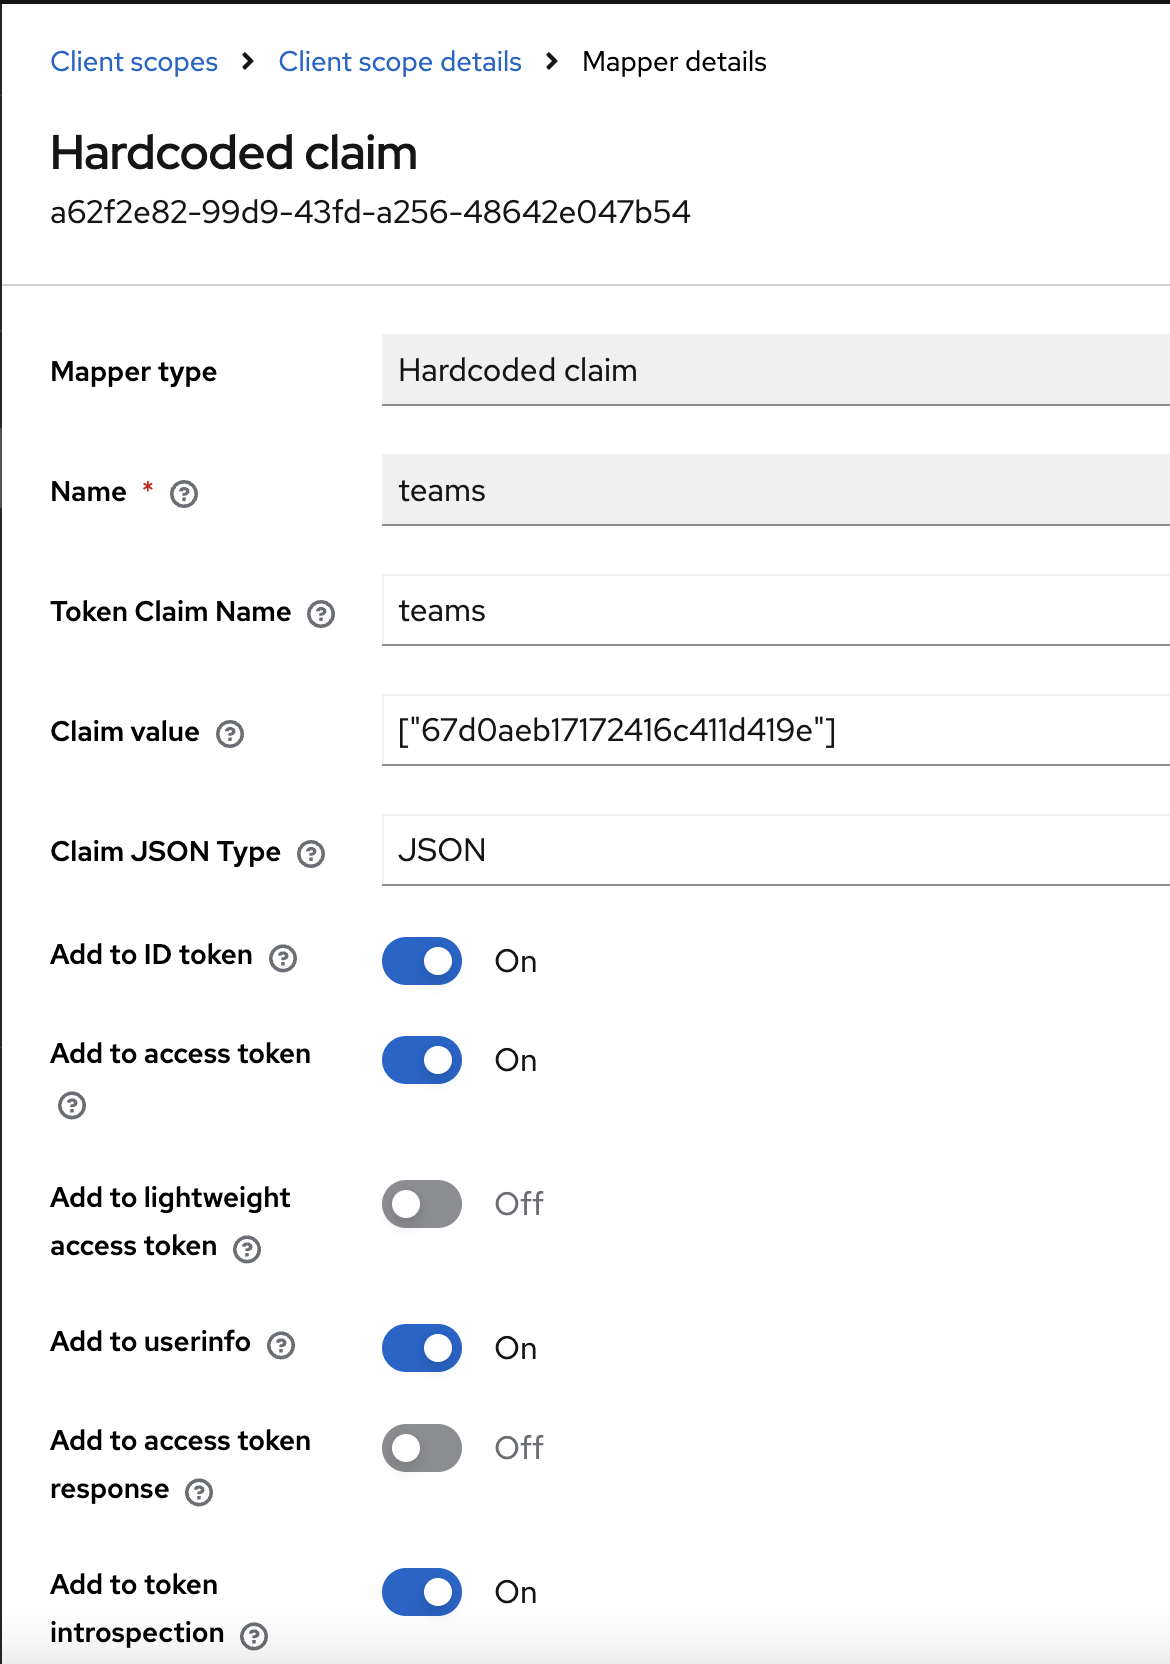 You can add more team IDs in the claim value as a comma-separated list, e.g. `["teamid1","teamid2"]`.\
This provides an extra layer of security, ensuring that only users belonging to the specified teams can access the application.
### 7. Assign Roles to Client Scope
After creating the client scope, you need to assign both client and realm roles to it:
1. Navigate to the `gateway.read` client scope
2. Go to the "Scope" tab
3. Assign the roles:
First, assign the client role:
* Click "Assign role"
* Select "Filter by client" and choose "linqra-gateway-client"
* Select `gateway_admin`
* Click "Assign"
Then, assign the realm role:
* Click "Assign role" again
* Select "Filter by realm roles"
* Select `gateway_admin_realm`
* Click "Assign"
You can add more team IDs in the claim value as a comma-separated list, e.g. `["teamid1","teamid2"]`.\
This provides an extra layer of security, ensuring that only users belonging to the specified teams can access the application.
### 7. Assign Roles to Client Scope
After creating the client scope, you need to assign both client and realm roles to it:
1. Navigate to the `gateway.read` client scope
2. Go to the "Scope" tab
3. Assign the roles:
First, assign the client role:
* Click "Assign role"
* Select "Filter by client" and choose "linqra-gateway-client"
* Select `gateway_admin`
* Click "Assign"
Then, assign the realm role:
* Click "Assign role" again
* Select "Filter by realm roles"
* Select `gateway_admin_realm`
* Click "Assign"
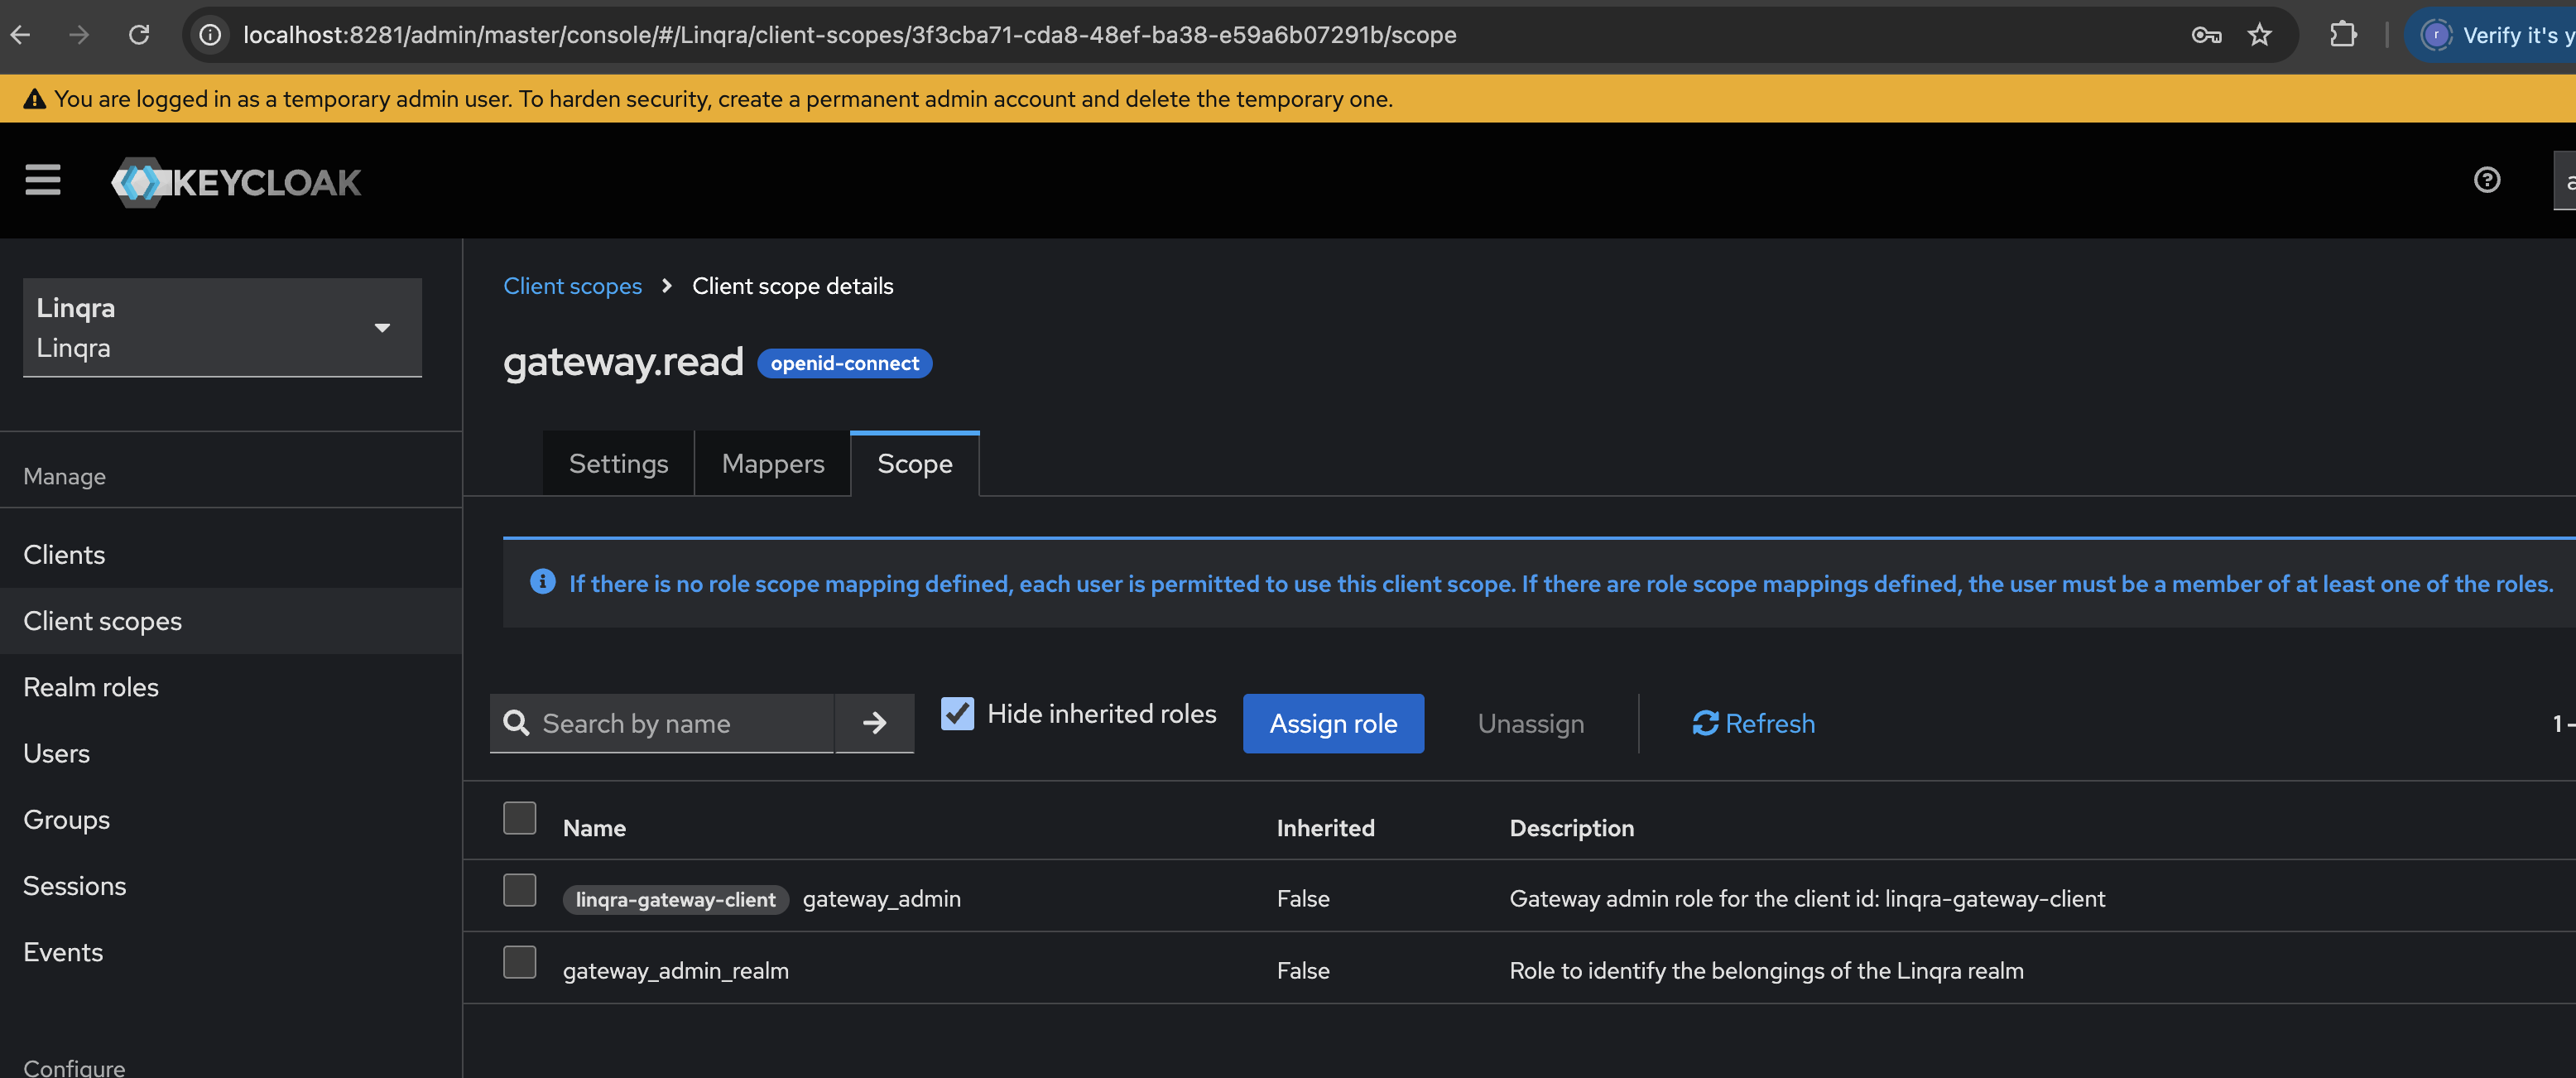 These role assignments determine what permissions are included when the `gateway.read` scope is used. Users must have at least one of these roles to use this client scope.
If no role scope mapping is defined, any user can use this client scope. Adding role mappings restricts the scope to users with the specified roles.
### 8. Add Client Scopes to Client
Finally, you need to add both the `gateway.read` and `team.scope` scopes to the `linqra-gateway-client`:
1. Navigate to the `linqra-gateway-client` settings
2. Go to the "Client scopes" tab
3. Click "Add client scope"
4. In the popup:
* Find and select `gateway.read`
* Make sure it's set as "Default"
* Click "Add"
5. Repeat the process to add `team.scope` as a "Default" client scope as well
These role assignments determine what permissions are included when the `gateway.read` scope is used. Users must have at least one of these roles to use this client scope.
If no role scope mapping is defined, any user can use this client scope. Adding role mappings restricts the scope to users with the specified roles.
### 8. Add Client Scopes to Client
Finally, you need to add both the `gateway.read` and `team.scope` scopes to the `linqra-gateway-client`:
1. Navigate to the `linqra-gateway-client` settings
2. Go to the "Client scopes" tab
3. Click "Add client scope"
4. In the popup:
* Find and select `gateway.read`
* Make sure it's set as "Default"
* Click "Add"
5. Repeat the process to add `team.scope` as a "Default" client scope as well
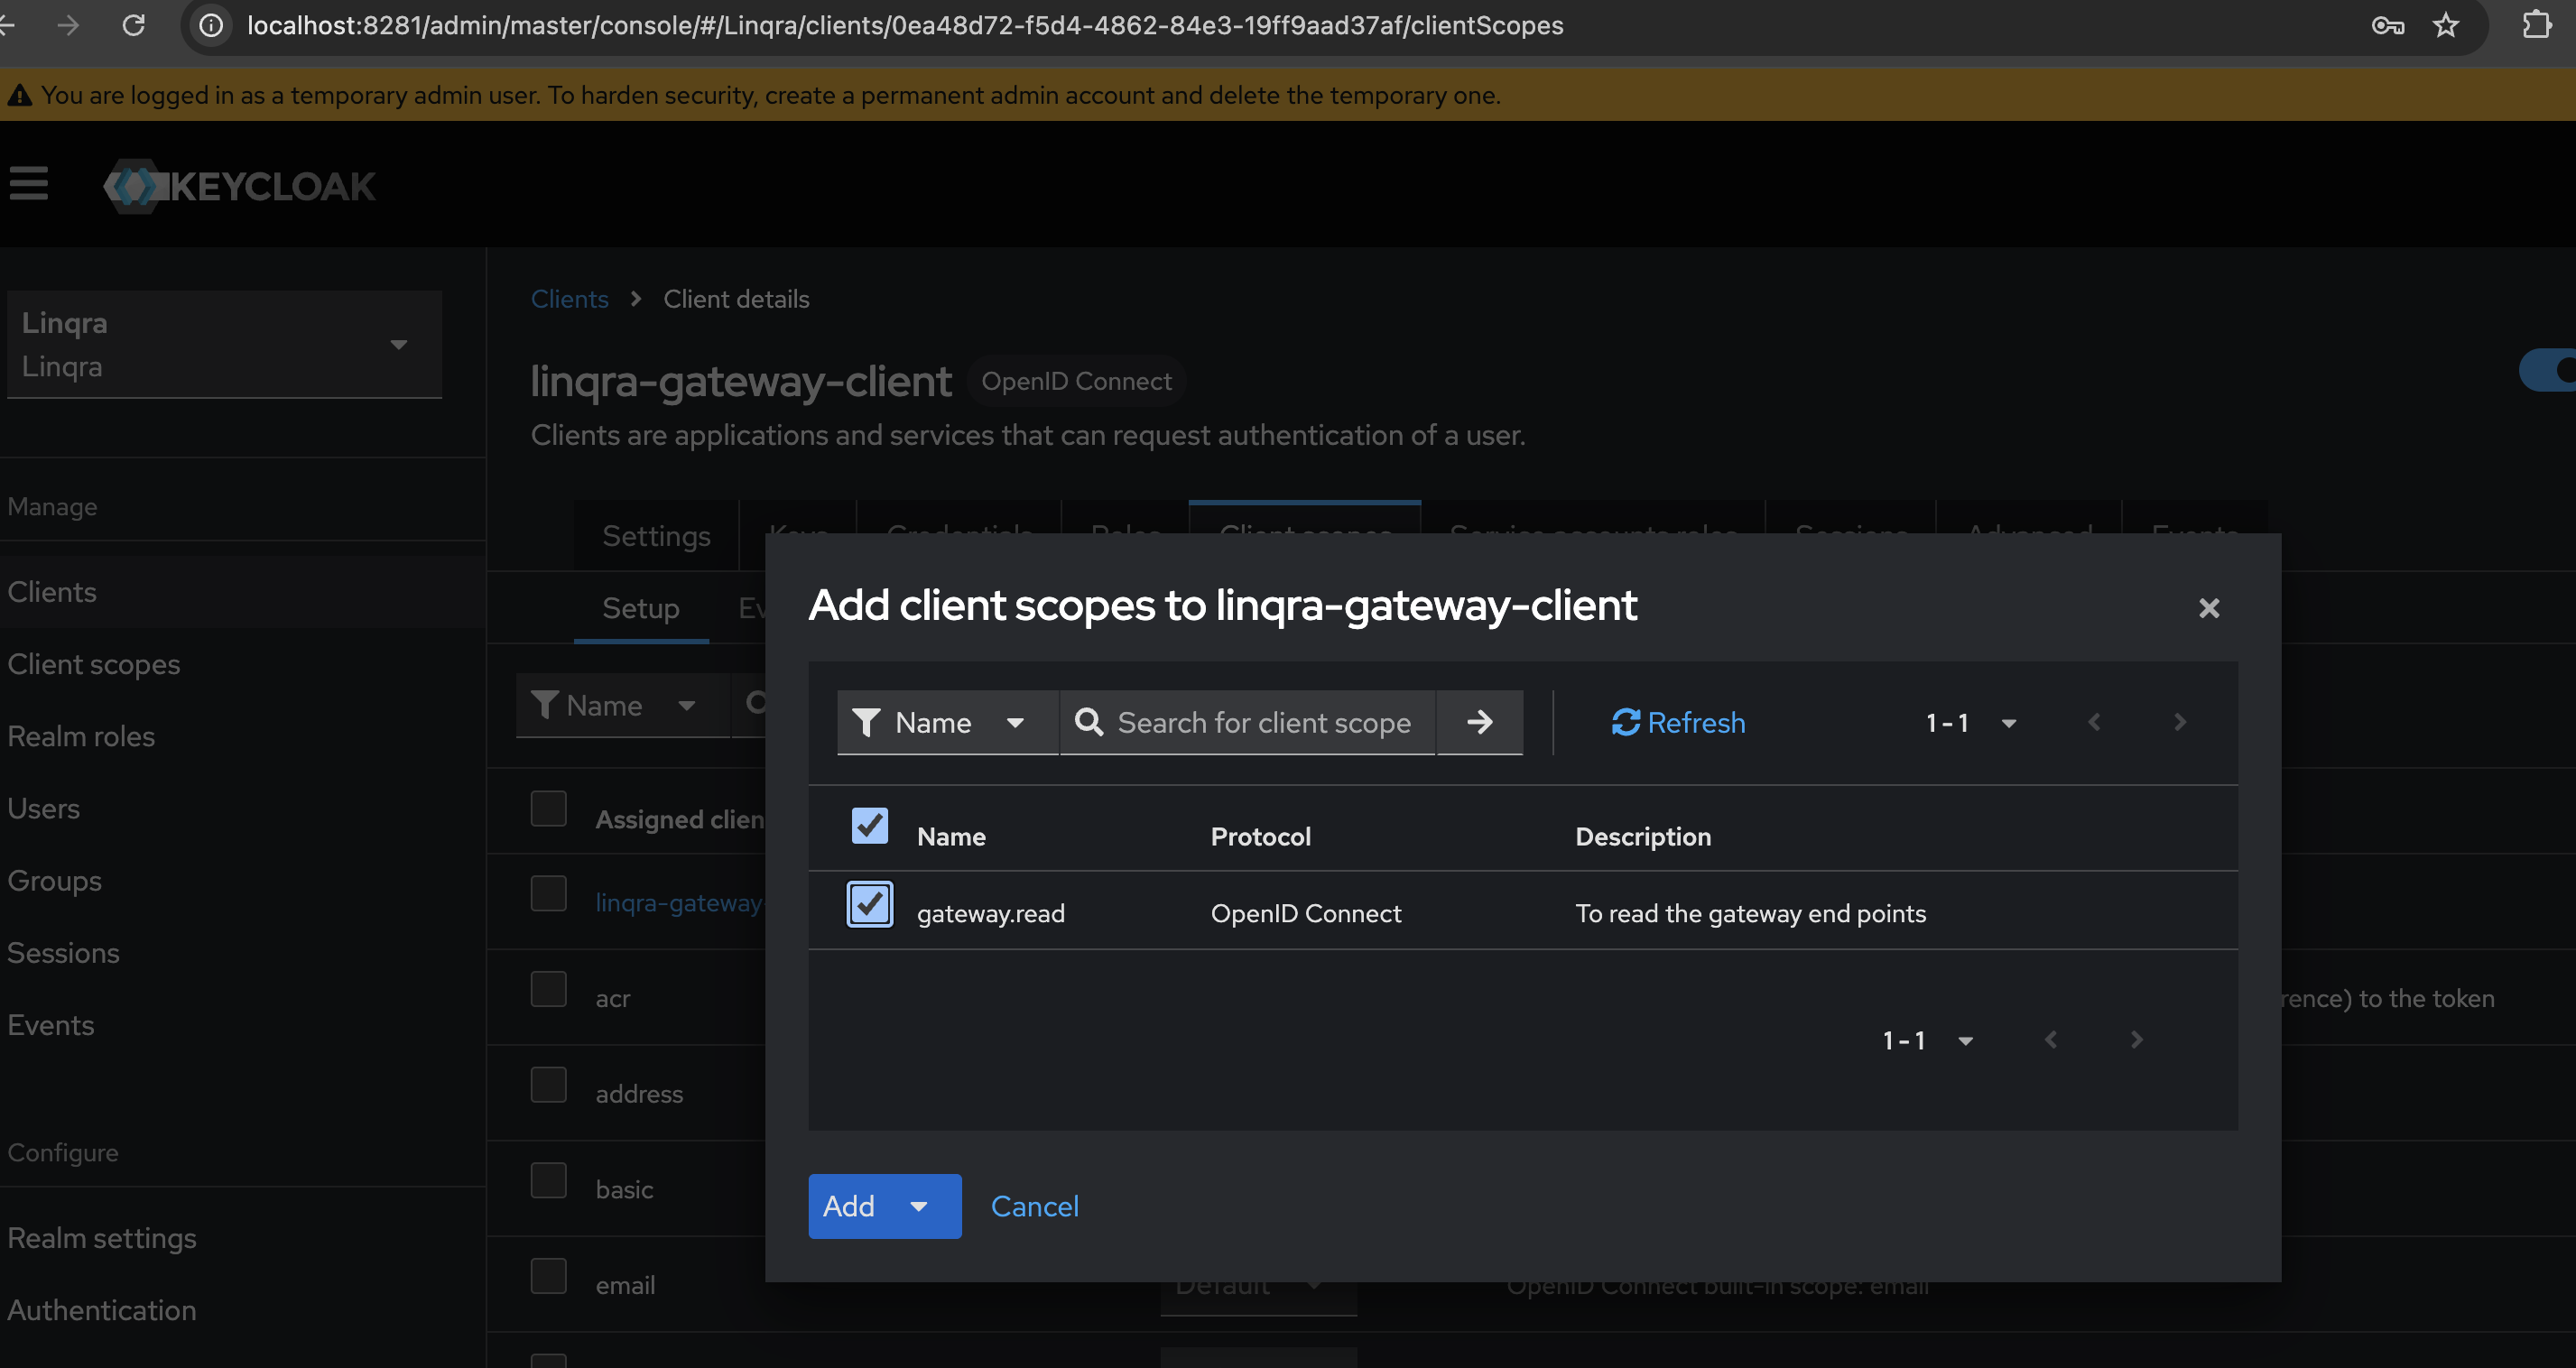 Setting both scopes as "Default" ensures they will be automatically included in every token request for this client, providing both endpoint and team-based access control.
This is a crucial final step that links the client scope to the client. Without this connection, the client won't receive the necessary permissions in its tokens.
### 9. Frontend URL Configuration
The Frontend URL configuration varies depending on your deployment environment:
#### Standalone Environment
If running Keycloak standalone:
```bash theme={null}
Frontend URL: http://localhost:8281
```
#### Containerized Environment
If running in Docker/containers:
```bash theme={null}
Frontend URL: http://keycloak-service:8080
```
Setting both scopes as "Default" ensures they will be automatically included in every token request for this client, providing both endpoint and team-based access control.
This is a crucial final step that links the client scope to the client. Without this connection, the client won't receive the necessary permissions in its tokens.
### 9. Frontend URL Configuration
The Frontend URL configuration varies depending on your deployment environment:
#### Standalone Environment
If running Keycloak standalone:
```bash theme={null}
Frontend URL: http://localhost:8281
```
#### Containerized Environment
If running in Docker/containers:
```bash theme={null}
Frontend URL: http://keycloak-service:8080
```
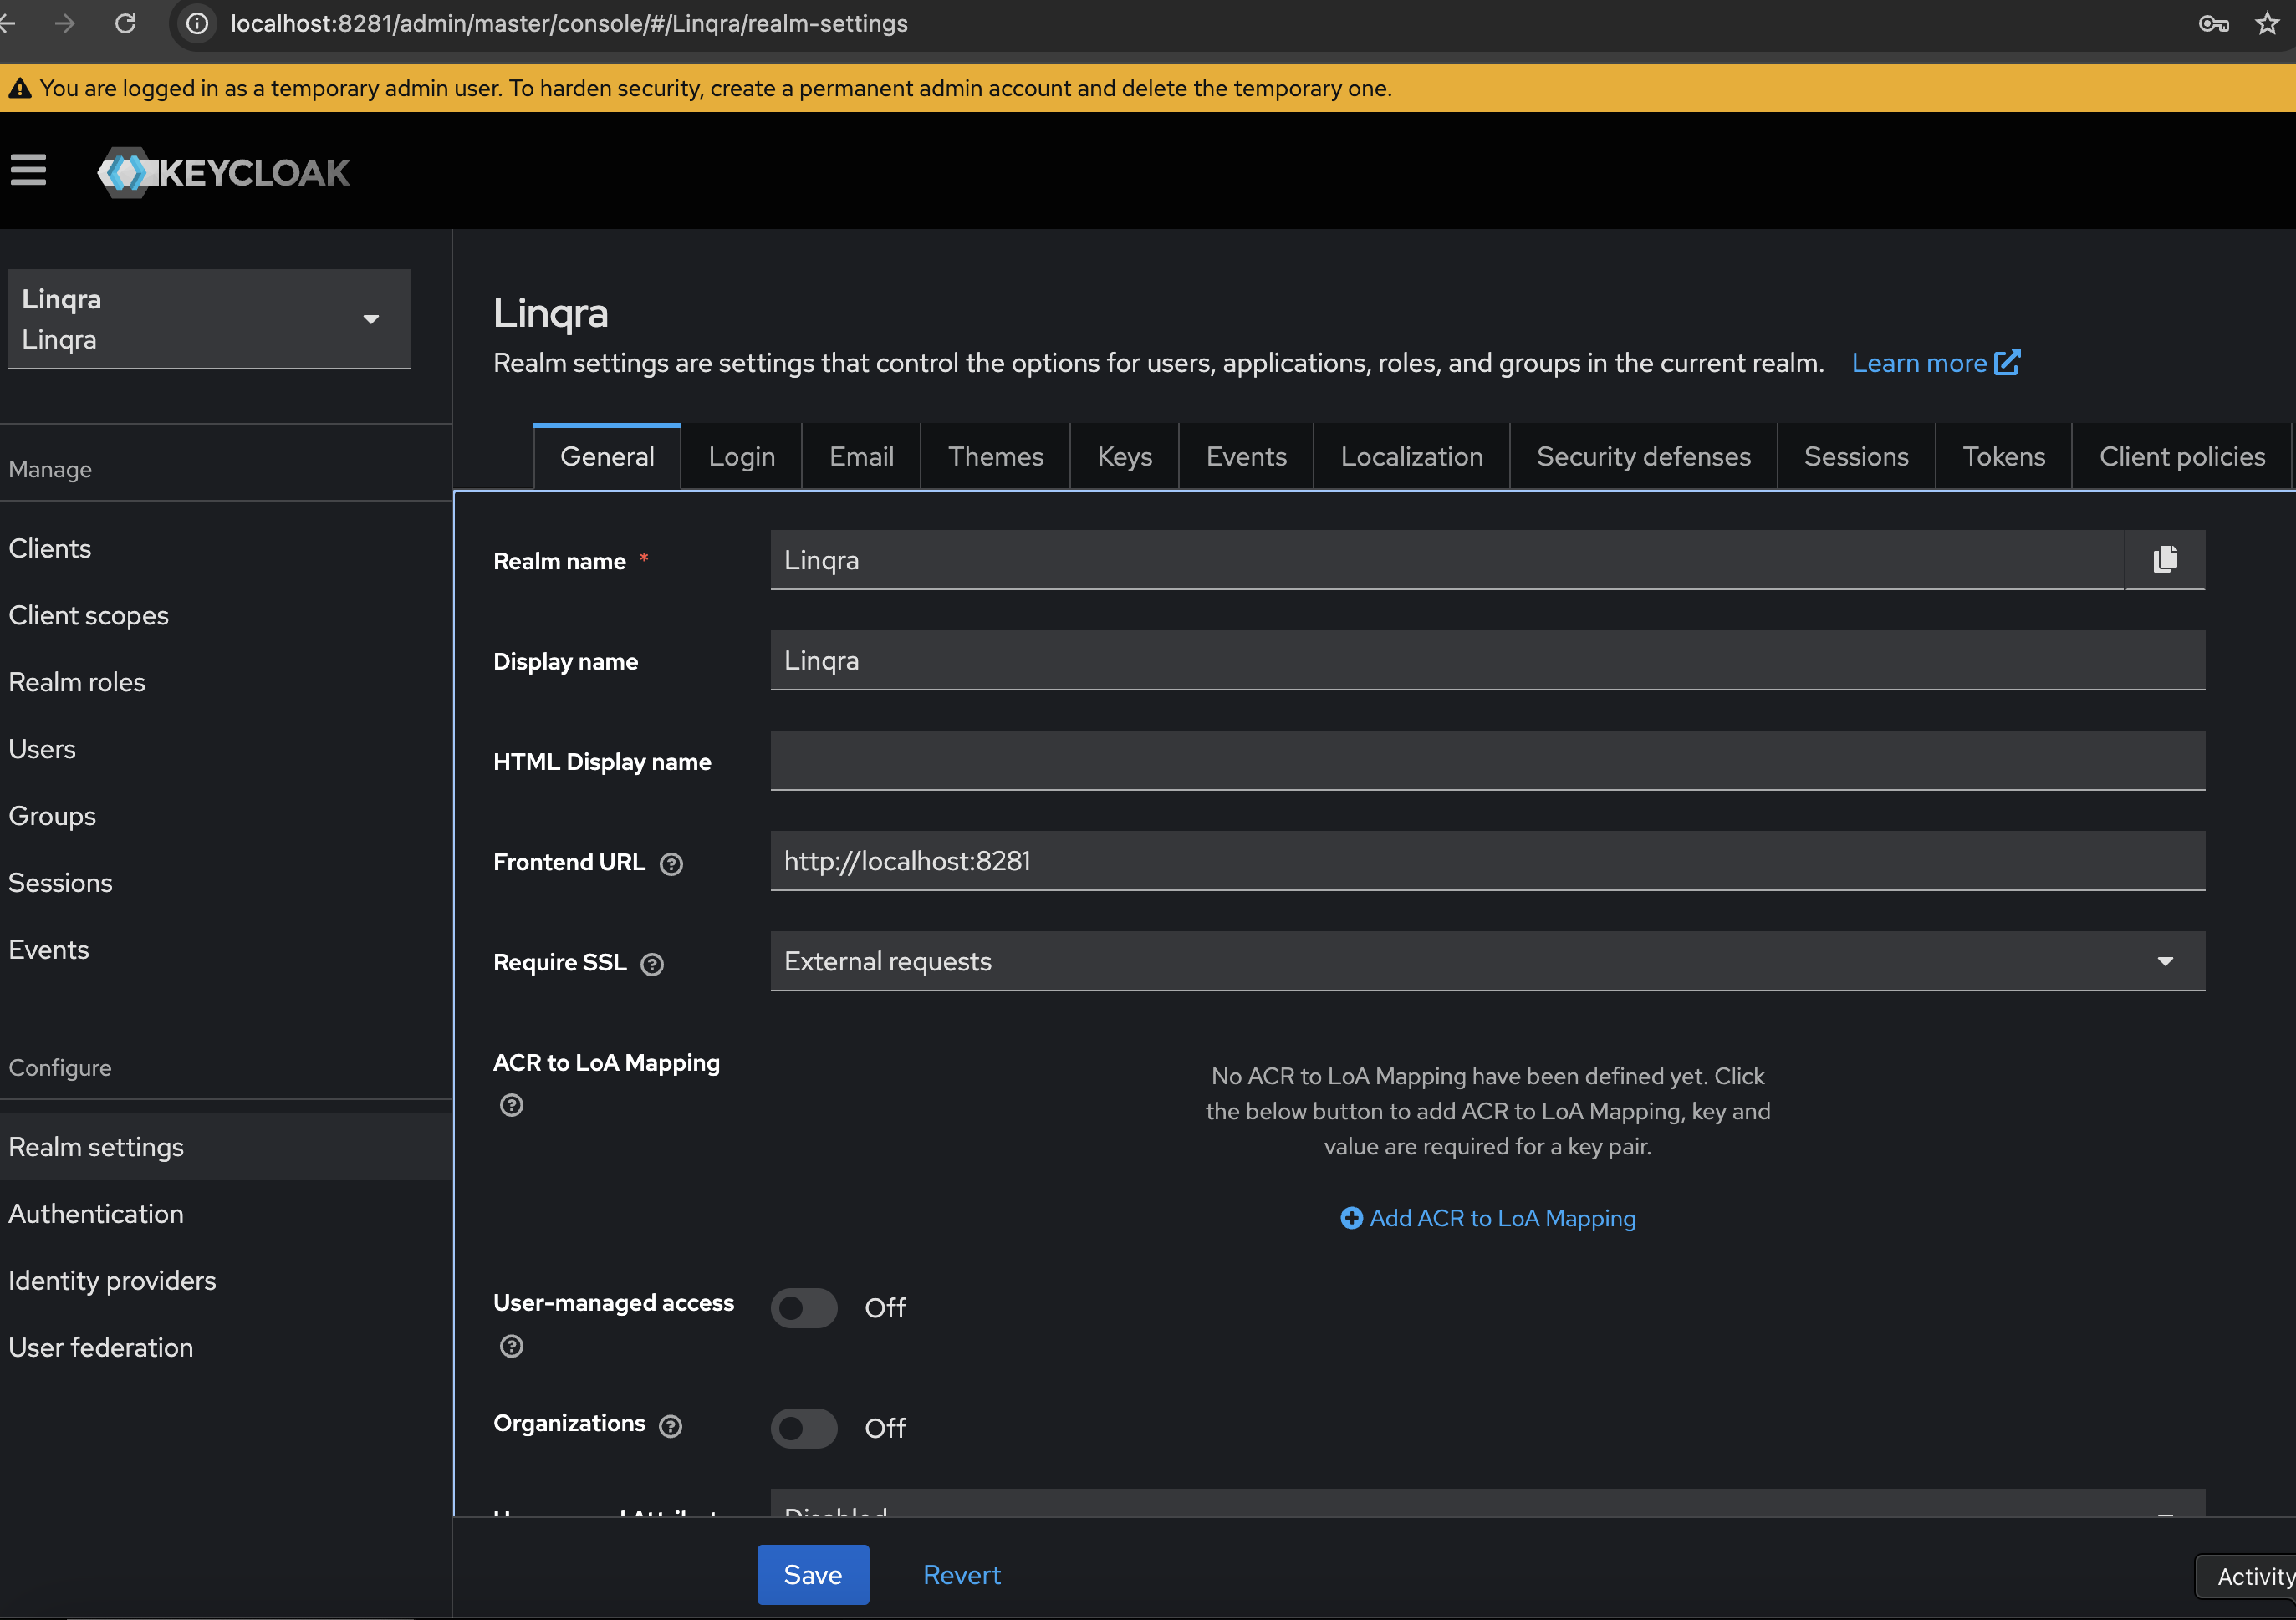 Make sure to use the correct URL based on your deployment:
* Use `http://localhost:8281` for standalone deployment
* Use `http://keycloak-service:8080` when running in containers with Docker Compose
Using the wrong URL will cause authentication flows to fail.
The Frontend URL setting is crucial for proper redirection in authentication flows. It tells Keycloak which base URL to use when generating redirect URLs and other authentication-related endpoints.
Make sure to use the correct URL based on your deployment:
* Use `http://localhost:8281` for standalone deployment
* Use `http://keycloak-service:8080` when running in containers with Docker Compose
Using the wrong URL will cause authentication flows to fail.
The Frontend URL setting is crucial for proper redirection in authentication flows. It tells Keycloak which base URL to use when generating redirect URLs and other authentication-related endpoints.