> ## Documentation Index
> Fetch the complete documentation index at: https://docs.linqra.com/llms.txt
> Use this file to discover all available pages before exploring further.
# EC2 Deployment with SSL for linqra.com
> Deploy Linqra on AWS EC2 and configure SSL certificates for linqra.com
## 1. Connect to Your EC2 Server
Use SSH to connect to your EC2 instance:
```bash theme={null}
ssh -i "yourfile.pem" ubuntu@ec2-XX-XXX-XX-XXX.us-west-2.compute.amazonaws.com
```
You should see a prompt like:
## 2. Generate SSL Key and CSR
Create the private key and certificate signing request (CSR):
```bash theme={null}
sudo openssl req -new -newkey rsa:2048 -nodes \
-keyout linqra.key \
-out linqra.csr \
-subj "/C=US/ST=Texas/L=Houston/O=Linqra/OU=Production/CN=linqra.com"
```
Check the generated files:
```bash theme={null}
ls -ltr
# Output example:
# -rw------- 1 root root 1704 Apr 8 17:02 linqra.key
```
***
## 3. Obtain SSL Certificates
* Go to your SSL provider (e.g., GoDaddy, Namecheap, or any hosting site that sells SSL certificates).
* Copy the contents of `linqra.csr` and paste it into the provider's CSR box.
* Submit and wait for approval.
* Download the resulting ZIP file (Server type: Other), e.g. `linqra.com.zip`.
**You will receive:**
* `f8d48b14580110e.crt`
* `f8d48b14580110e.pem` (identical to the .crt)
* `gd_bundle-g2.crt`
***
## 4. Upload Certificates to the Server
Use FileZilla, IntelliJ, or another SFTP tool to upload the two `.crt` files to `/tmp/` on your EC2 server.
Then move them to the target directory:
```bash theme={null}
sudo mv /tmp/*.crt /etc/pki/tls/certs/2025/
ls -ltr /etc/pki/tls/certs/2025/
```
> **Note:** The `.pem` and `.crt` files from your provider are often identical.
***
## 5. Generate the Certificate Chain
Switch to root and concatenate the certificate and bundle to create the chained certificate:
```bash theme={null}
sudo su
cat f8d48b14580110e.crt gd_bundle-g2.crt >> linqrachained2025.crt
exit
```
Check the resulting files:
```bash theme={null}
ls -ltr
# -rw------- 1 root root 1704 Apr 8 17:03 linqra.key
# -rw-r--r-- 1 root root 1009 Apr 8 17:03 linqra.csr
# -rw-rw-r-- 1 ubuntu ubuntu 2329 Apr 8 17:21 f8d48b14580110e.crt
# -rw-rw-r-- 1 ubuntu ubuntu 3095 Apr 8 17:21 gd_bundle-g2.crt
# -rw-r--r-- 1 root root 5424 Apr 8 17:24 linqrachained2025.crt
```
***
You now have all the necessary SSL files (`linqra.key`, `linqrachained2025.crt`) to configure your web server for HTTPS on linqra.com.
***
## 6. Set Up AWS EC2 Folders and Prepare for Deployment
Create the necessary directories for your application and logs:
```bash theme={null}
sudo mkdir -p /var/www/linqra
sudo mkdir -p /var/www/linqra/logs
```
***
## 7. Manage Nginx
You may need these commands to manage the Nginx service:
```bash theme={null}
sudo systemctl status nginx
sudo systemctl start nginx
sudo systemctl stop nginx
sudo systemctl restart nginx
```
***
## 8. Configure Nginx for SSL and React Frontend
Edit the default Nginx site configuration:
```bash theme={null}
sudo vi /etc/nginx/sites-available/default
```
Example configuration:
```nginx theme={null}
server {
server_name linqra.com www.linqra.com;
listen 80;
listen [::]:80;
return 301 https://linqra.com$request_uri;
}
server {
server_name www.linqra.com;
listen 443 ssl;
listen [::]:443 ssl;
ssl_certificate /etc/pki/tls/certs/2025/linqrachained2025.crt;
ssl_certificate_key /etc/pki/tls/certs/2025/linqra.key;
ssl_protocols TLSv1.2 TLSv1.1;
return 301 https://linqra.com$request_uri;
}
server {
listen 443 ssl;
ssl_certificate /etc/pki/tls/certs/2025/linqrachained2025.crt;
ssl_certificate_key /etc/pki/tls/certs/2025/linqra.key;
ssl_protocols TLSv1.2 TLSv1.1;
server_name linqra.com;
# Increase buffer sizes
proxy_buffer_size 128k;
proxy_buffers 4 256k;
proxy_busy_buffers_size 256k;
proxy_max_temp_file_size 0;
proxy_http_version 1.1;
# Increase header buffer size
large_client_header_buffers 4 16k;
client_header_buffer_size 4k;
client_max_body_size 50M;
# Logs
access_log /var/www/linqra/logs/access.log;
error_log /var/www/linqra/logs/error.log;
location /keycloak/ {
proxy_pass http://localhost:8281;
proxy_set_header X-Forwarded-For $proxy_add_x_forwarded_for;
proxy_set_header X-Forwarded-Proto https;
proxy_set_header X-Forwarded-Host $host;
proxy_set_header Host $host;
proxy_set_header X-Real-IP $remote_addr;
# Add this rewrite rule to handle the redirect
proxy_redirect http://localhost:8281 https://linqra.com/keycloak;
proxy_http_version 1.1;
proxy_set_header Upgrade $http_upgrade;
proxy_set_header Connection "upgrade";
proxy_redirect http:// https://;
}
# Handle realms paths
location /realms/ {
rewrite ^/realms/(.*) /keycloak/realms/$1 last;
}
# Handle resources paths
location /resources/ {
rewrite ^/resources/(.*) /keycloak/resources/$1 last;
}
# Handle admin paths
location /admin/ {
rewrite ^/admin/(.*) /keycloak/admin/$1 last;
}
location /eureka/ {
proxy_pass https://localhost:8761/eureka/;
proxy_ssl_verify off; # Only if using self-signed certs
proxy_set_header X-Forwarded-For $proxy_add_x_forwarded_for;
proxy_set_header X-Forwarded-Proto https;
proxy_set_header X-Forwarded-Host $host;
proxy_set_header Host $host;
proxy_set_header X-Real-IP $remote_addr;
}
location /api/auth/sso/callback {
proxy_pass https://localhost:7777/api/auth/sso/callback;
proxy_set_header Host $host;
proxy_set_header X-Real-IP $remote_addr;
proxy_set_header X-Forwarded-For $proxy_add_x_forwarded_for;
proxy_set_header X-Forwarded-Proto $scheme;
proxy_ssl_verify off; # Since you're using self-signed certs
}
location /api/ {
proxy_pass https://localhost:7777/api/;
proxy_set_header Host $host;
proxy_set_header X-Real-IP $remote_addr;
proxy_set_header X-Forwarded-For $proxy_add_x_forwarded_for;
proxy_set_header X-Forwarded-Proto $scheme;
}
location /metrics/ {
proxy_pass https://localhost:7777/metrics/;
proxy_set_header Host $host;
proxy_set_header X-Real-IP $remote_addr;
proxy_set_header X-Forwarded-For $proxy_add_x_forwarded_for;
proxy_set_header X-Forwarded-Proto $scheme;
}
location /ws-linqra {
proxy_pass https://localhost:7777/ws-linqra;
proxy_http_version 1.1;
proxy_set_header Upgrade $http_upgrade;
proxy_set_header Connection "upgrade";
proxy_set_header Host $host;
proxy_set_header X-Real-IP $remote_addr;
proxy_set_header X-Forwarded-For $proxy_add_x_forwarded_for;
proxy_set_header X-Forwarded-Proto $scheme;
proxy_ssl_verify off; # Only if using self-signed certs
}
location /callback {
root /var/www/linqra/edge-service;
try_files $uri $uri/ /index.html;
# Add necessary headers
add_header X-Frame-Options "SAMEORIGIN";
add_header X-XSS-Protection "1; mode=block";
add_header X-Content-Type-Options "nosniff";
# Ensure proper proxy headers
proxy_set_header Host $host;
proxy_set_header X-Real-IP $remote_addr;
proxy_set_header X-Forwarded-For $proxy_add_x_forwarded_for;
proxy_set_header X-Forwarded-Proto $scheme;
}
location /r/ {
proxy_pass https://localhost:7777/r/;
proxy_set_header Host $host;
proxy_set_header X-Real-IP $remote_addr;
proxy_set_header X-Forwarded-For $proxy_add_x_forwarded_for;
proxy_set_header X-Forwarded-Proto $scheme;
proxy_ssl_verify off; # Only if using self-signed certs
}
location /linq {
proxy_pass https://localhost:7777/linq;
proxy_set_header Host $host;
proxy_set_header X-Real-IP $remote_addr;
proxy_set_header X-Forwarded-For $proxy_add_x_forwarded_for;
proxy_set_header X-Forwarded-Proto $scheme;
proxy_set_header X-Api-Key $http_x_api_key;
proxy_set_header X-Api-Key-Name $http_x_api_key_name;
proxy_ssl_verify off;
}
location / {
root /var/www/linqra/edge-service;
try_files $uri $uri/ /index.html;
# Basic security headers
add_header X-Frame-Options "SAMEORIGIN";
add_header X-XSS-Protection "1; mode=block";
add_header X-Content-Type-Options "nosniff";
}
# Static assets
location /static/ {
root /var/www/html/linqra/edge-service;
expires 1y;
add_header Cache-Control "public, no-transform";
}
# Deny access to sensitive files
location ~ /\. {
deny all;
}
}
```
***
## 9. Enable the Nginx Site
Symlink the `sites-available` file to the `sites-enabled` folder:
```bash theme={null}
sudo ln -s /etc/nginx/sites-available/default /etc/nginx/sites-enabled/default
```
***
## 10. Set Permissions for Deployment
Navigate to your deployment directory and set the correct permissions:
```bash theme={null}
cd /var/www/html/linqra
sudo chown -R www-data:www-data edge-service
sudo find edge-service -type d -exec chmod 755 {} \;
sudo find edge-service -type f -exec chmod 644 {} \;
ls -la edge-service
```
***
**Note:**
* Always edit the `sites-available` file for Nginx configuration.
* Adjust the paths and domain names as needed for your environment.
***
## 11. Configure GitHub Actions Repository Secrets
To enable automated deployment and secure access, add the following secrets to your GitHub repository:
### 1. SSH Key for EC2
Generate or use your existing SSH private key.\
**Example (do not use this key, just for illustration):**
```
-----BEGIN RSA PRIVATE KEY-----
AIIEogIBAAKCAQEAnIEpVE0yKTyvd63vXoFlICdqOlMNNIjCogHbE6Np/fgmDC8G
... (key content) ...
-----END RSA PRIVATE KEY-----
```
Add this as a new repository secret named:
```
EC2_SSH_KEY_PROD
```
***
### 2. EC2 Host and Deployment Info
Add the following repository secrets:
| Secret Name | Example Value |
| ----------------- | ------------------------------------------------- |
| `HOST_DNS_PROD` | ec2-XX-XXX-XX-XXX.us-west-2.compute.amazonaws.com |
| `USERNAME_PROD` | ubuntu |
| `TARGET_DIR_PROD` | /var/www/linqra |
***
### 3. AWS Credentials
| Secret Name | Example Value |
| ----------- | ---------------------------------------- |
| `AWS_KEY` | BKIA2YCP4BIK8KAWUILY |
| `AWS_SEC` | 0UraNVReMtYbiqOB0ZGKiUTFzHFTFg9AZayniFda |
***
### 4. Web Application Secrets
Copy these from your web environment files and add as repository secrets:
| Secret Name | Example Value |
| ------------------------------ | -------------------------------------------------------------------------------------------------------- |
| `JWT_SECRET` | 4a98d4c7b6e5f2a1d8c9b4a7e6f3d2c1b8a7e6f3d2c1b8a7e6f3d2c1b8a7e6f3d2c1b8a7e6f3d2c1b8a7e6f3d2c1b8a7e6f3d2c2 |
| `NODE_ENV` | production |
| `VITE_WS_URL` | wss\://linqra.com/ws-linqra |
| `VITE_MONGODB_URI` | mongodb://root:mongopw\@localhost:27017 |
| `VITE_MONGODB_DB_NAME` | Linqra |
| `VITE_API_GATEWAY_URL` | [https://linqra.com](https://linqra.com) |
| `REACT_APP_KEYCLOAK_URL` | [https://linqra.com/keycloak](https://linqra.com/keycloak) |
| `REACT_APP_KEYCLOAK_REALM` | Linqra |
| `REACT_APP_KEYCLOAK_CLIENT_ID` | linqra-gateway-client |
| `VITE_API_KEY` | lm\_8e2093b6b9634dca9460f8d0cdfe38cb |
| `VITE_API_KEY_NAME` | MyApiKey |
***
**How to add a secret:**
1. Go to your GitHub repository.
2. Click on **Settings** > **Secrets and variables** > **Actions**.
3. Click **New repository secret**.
4. Enter the name and value, then click **Add secret**.
***
> **Tip:**\
> Never commit your private keys or secrets to the repository. Always use GitHub Actions secrets for sensitive data.
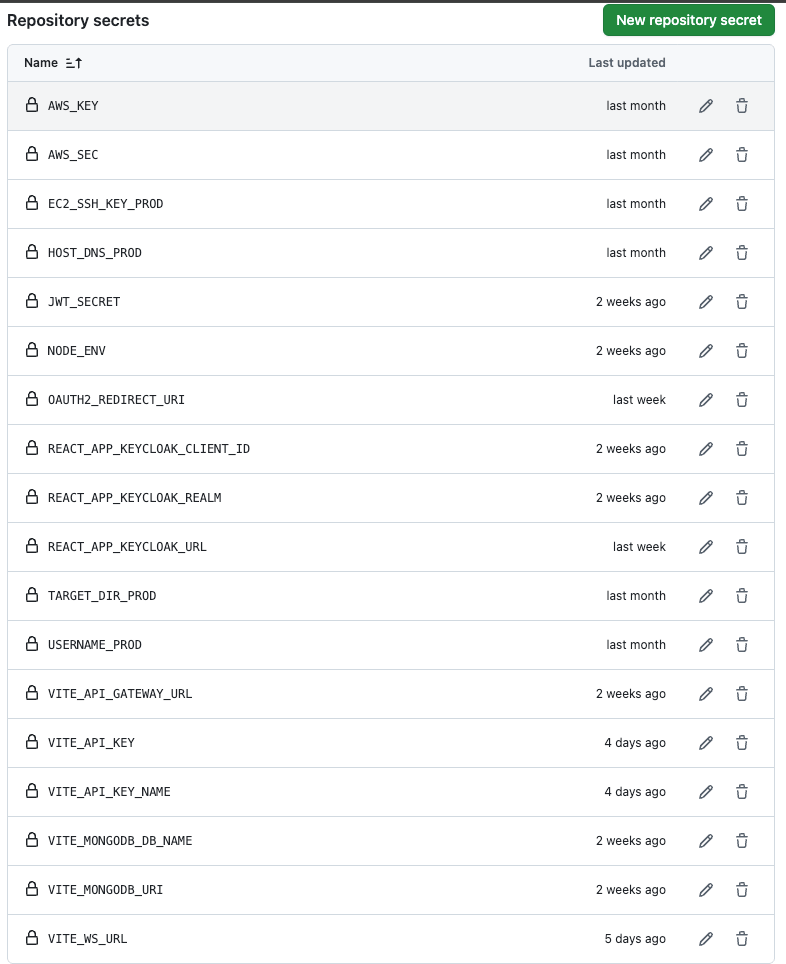 With the above GitHub secrets configured, your `ci.yml` workflow will automatically deploy all necessary files to your EC2 server whenever new code is merged into the `master` branch. This ensures a secure and automated deployment process.
We'll cover the Dockerization steps for your application in the next section.
## 12. Final GitHub Actions CI/CD Pipeline (`ci.yml`)
Below is the complete `ci.yml` workflow file used for automated deployment.\
**Once code is merged into the `master` branch, this pipeline will automatically build and deploy your application to the EC2 server—no additional manual steps are required.**
````yaml theme={null}
name: Linqra CI
on:
push:
branches: [ "master" ]
pull_request:
branches: [ "master" ]
permissions:
contents: write
jobs:
java-app:
runs-on: ubuntu-latest
steps:
- uses: actions/checkout@v4
# Upload API Gateway source files
- name: Upload API Gateway source
uses: actions/upload-artifact@v4
with:
name: api-gateway-source
path: |
api-gateway/**
!api-gateway/target/**
!api-gateway/target/
# Upload Discovery Server source files
- name: Upload Discovery Server source
uses: actions/upload-artifact@v4
with:
name: discovery-server-source
path: |
discovery-server/**
!discovery-server/target/**
!discovery-server/target/
# Upload docker-compose.yml
- name: Upload docker-compose file
uses: actions/upload-artifact@v4
with:
name: docker-compose
path: docker-compose-ec2.yml
# Upload root pom.xml
- name: Upload root pom file
uses: actions/upload-artifact@v4
with:
name: root-pom
path: pom.xml
# Debug and upload .kube directory with hidden files
- name: Debug .kube directory
run: |
echo "Checking .kube directory contents:"
ls -la .kube/
- name: Copy .kube to temporary directory
run: |
cp -r .kube kube-config
- name: Upload kube directory
uses: actions/upload-artifact@v4
with:
name: kube-config
path: kube-config/**
# Add this new step to upload keys directory
- name: Upload keys directory
uses: actions/upload-artifact@v4
with:
name: keys-config
path: keys/
if-no-files-found: error
# we build react here in the GitHub actions
react-build:
needs: java-app
runs-on: ubuntu-latest
defaults:
run:
working-directory: ./edge-service
steps:
- uses: actions/checkout@v4
- name: Create .env file
run: |
cat < .env
VITE_MONGODB_URI=${{ secrets.VITE_MONGODB_URI }}
VITE_MONGODB_DB_NAME=${{ secrets.VITE_MONGODB_DB_NAME }}
NODE_ENV=production
JWT_SECRET=${{ secrets.JWT_SECRET }}
VITE_WS_URL=${{ secrets.VITE_WS_URL }}
VITE_API_GATEWAY_URL=${{ secrets.VITE_API_GATEWAY_URL }}
REACT_APP_KEYCLOAK_URL=${{ secrets.REACT_APP_KEYCLOAK_URL }}
REACT_APP_KEYCLOAK_REALM=${{ secrets.REACT_APP_KEYCLOAK_REALM }}
REACT_APP_KEYCLOAK_CLIENT_ID=${{ secrets.REACT_APP_KEYCLOAK_CLIENT_ID }}
VITE_API_KEY=${{ secrets.VITE_API_KEY }}
VITE_API_KEY_NAME=${{ secrets.VITE_API_KEY_NAME }}
EOF
working-directory: ./edge-service
- name: Set up Node.js
uses: actions/setup-node@v4
with:
node-version: '21.5.0'
cache: 'npm'
cache-dependency-path: './edge-service/package-lock.json'
- name: Upgrade npm
run: npm install -g npm@10.8.1
- name: Remove package-lock.json
run: rm -f package-lock.json
- name: Install dependencies
run: npm install --legacy-peer-deps
continue-on-error: true
- name: Build React app
run: npm run build
env:
CI: false
- name: Run tests
run: npm test
env:
CI: false
# Upload React build
- name: Upload React build
uses: actions/upload-artifact@v4
with:
name: react-build
path: edge-service/dist
deploy:
needs: [java-app, react-build]
runs-on: ubuntu-latest
if: github.ref == 'refs/heads/master'
steps:
- name: Download all artifacts
uses: actions/download-artifact@v4
with:
path: artifacts
- name: Install SSH key
uses: webfactory/ssh-agent@v0.9.0
with:
ssh-private-key: ${{ secrets.EC2_SSH_KEY_PROD }}
- name: Deploy to EC2
env:
EC2_HOST: ${{ secrets.HOST_DNS_PROD }}
EC2_USERNAME: ${{ secrets.USERNAME_PROD }}
TARGET_DIR: ${{ secrets.TARGET_DIR_PROD }}
run: |
# Disable strict host key checking
mkdir -p ~/.ssh
echo "StrictHostKeyChecking no" >> ~/.ssh/config
# Rsync main directories (only changed/new files, with sudo on remote)
rsync -avz --delete --rsync-path="sudo rsync" artifacts/api-gateway-source/ $EC2_USERNAME@$EC2_HOST:/var/www/linqra/api-gateway/
rsync -avz --delete --rsync-path="sudo rsync" artifacts/discovery-server-source/ $EC2_USERNAME@$EC2_HOST:/var/www/linqra/discovery-server/
rsync -avz --delete --rsync-path="sudo rsync" artifacts/react-build/ $EC2_USERNAME@$EC2_HOST:/var/www/linqra/edge-service/
# Use scp for sensitive or always-fresh files
scp -v artifacts/docker-compose/docker-compose-ec2.yml $EC2_USERNAME@$EC2_HOST:/var/www/linqra/docker-compose.yml
scp -v artifacts/root-pom/pom.xml $EC2_USERNAME@$EC2_HOST:/var/www/linqra/pom.xml
# .kube and keys (if needed, use scp or rsync as appropriate)
if [ -d "artifacts/kube-config" ]; then
rsync -avz --delete \
--exclude 'mongodb/data1/' \
--exclude 'mongodb/data2/' \
--exclude 'mongodb/data3/' \
--exclude 'postgres/data/' \
--exclude 'pgadmin/data/' \
--rsync-path="sudo rsync" artifacts/kube-config/ $EC2_USERNAME@$EC2_HOST:/var/www/linqra/.kube/
fi
if [ -d "artifacts/keys-config" ]; then
rsync -avz --delete --rsync-path="sudo rsync" artifacts/keys-config/ $EC2_USERNAME@$EC2_HOST:/var/www/linqra/keys/
fi
# Set correct permissions for pgadmin
if [ -d /var/www/linqra/.kube/pgadmin/data ]; then
sudo chown -R 5050:5050 /var/www/linqra/.kube/pgadmin/data
sudo chmod -R 755 /var/www/linqra/.kube/pgadmin/data
fi
# Set correct permissions for MongoDB
for d in data1 data2 data3; do
if [ -d /var/www/linqra/.kube/mongodb/$d ]; then
sudo chown -R 999:999 /var/www/linqra/.kube/mongodb/$d
fi
done
if [ -f /var/www/linqra/.kube/mongodb/mongo-keyfile ]; then
sudo chown 999:999 /var/www/linqra/.kube/mongodb/mongo-keyfile
sudo chmod 400 /var/www/linqra/.kube/mongodb/mongo-keyfile
fi
# Ensure the parent directory exists
sudo mkdir -p /var/www/linqra/.kube/pgadmin/data
# Now set permissions
sudo chown -R 5050:5050 /var/www/linqra/.kube/pgadmin
sudo chmod -R 755 /var/www/linqra/.kube/pgadmin
# Ensure the sessions directory exists and is owned by pgadmin
sudo mkdir -p /var/www/linqra/.kube/pgadmin/data/sessions
sudo chown 5050:5050 /var/www/linqra/.kube/pgadmin/data/sessions
sudo chmod 700 /var/www/linqra/.kube/pgadmin/data/sessions
# Check that HAProxy config and cert files exist on the EC2 host
ssh $EC2_USERNAME@$EC2_HOST "
ls -l /var/www/linqra/.kube/gateway/haproxy.cfg
ls -l /var/www/linqra/keys/haproxy/gateway-combined-container.pem
"
# Ensure HAProxy cert file is readable by HAProxy in the container
ssh $EC2_USERNAME@$EC2_HOST "
sudo chmod 644 /var/www/linqra/keys/haproxy/gateway-combined-container.pem
"
echo "About to run SSH block"
ssh $EC2_USERNAME@$EC2_HOST "
# Set permissions
sudo chown -R ubuntu:ubuntu /var/www/linqra
sudo chmod -R 600 /var/www/linqra/keys/* || echo 'No keys to set permissions for'
sudo find /var/www/linqra/keys -type d -exec chmod 755 {} \;
sudo find /var/www/linqra/keys -type f ! -name 'mongo-keyfile' -exec chmod 600 {} \;
# Set correct permissions for mongo-keyfile
if [ -f /var/www/linqra/.kube/mongodb/mongo-keyfile ]; then
sudo chown 999:999 /var/www/linqra/.kube/mongodb/mongo-keyfile
sudo chmod 400 /var/www/linqra/.kube/mongodb/mongo-keyfile
fi
# Ensure HAProxy cert file is readable
if [ -f /var/www/linqra/keys/haproxy/gateway-combined-container.pem ]; then
sudo chmod 644 /var/www/linqra/keys/haproxy/gateway-combined-container.pem
fi
# Move to the deployment directory
cd /var/www/linqra
# Stop running containers
echo 'Stopping running containers'
sudo docker compose stop
# Prune unused images/containers/volumes/networks
echo 'Pruning unused images/containers/volumes/networks'
sudo docker system prune -a -f
# Check disk usage
echo 'Checking disk usage'
df -hT
# Ensure the Docker network exists
echo 'Ensuring the Docker network exists'
sudo docker network create linqra-network || true
# Build and start containers
echo 'Building and starting containers'
sudo docker compose -f docker-compose.yml -p linqra up -d --build
# Check if containers are running
echo 'Checking if containers are running'
docker ps
"
dependency-review:
if: github.event_name == 'pull_request'
runs-on: ubuntu-latest
steps:
- uses: actions/checkout@v4
- name: Dependency Review
uses: actions/dependency-review-action@v4
with:
fail-on-severity: high
## 13. Initial MongoDB Replica Set Setup (First Deployment Only)
On your very first deployment, you may encounter MongoDB issues because the replica set is not yet initialized.
**You only need to do this once.**
### 1. Connect to the Primary MongoDB Container
```bash
docker exec -it mongodb1 mongosh -u root -p mongopw --authenticationDatabase admin
````
You should see a prompt like:
```
test>
```
### 2. Initialize the Replica Set
At the `mongosh` prompt, run:
```javascript theme={null}
rs.initiate({
_id: "rs0",
members: [
{ _id: 0, host: "mongodb1:27017" },
{ _id: 1, host: "mongodb2:27018" },
{ _id: 2, host: "mongodb3:27019" }
]
}, { force: true });
```
You should see output similar to:
```
{ ok: 1 }
```
### 3. Check Replica Set Status
```javascript theme={null}
rs.status()
```
You should see a status object with `PRIMARY` and `SECONDARY` members.
***
**Note:**
* This setup is only required the first time you deploy your stack.
* For more information, see the [MongoDB Replica Set documentation](https://www.mongodb.com/docs/manual/replication/).
***
## 14. First Initial Data
After initializing the MongoDB replica set, you need to create the initial user and data for your application.
### 1. Exit the MongoDB Shell
If you are still inside the `mongosh` shell, type:
```
exit
```
***
### 2. Run the Initial Setup API Call
Use `curl` to create the first user and initialize the database:
```bash theme={null}
curl -k -X POST https://localhost:7777/api/setup/init \
-H "Content-Type: application/json" \
-d '{
"username": "linqrasa",
"email": "john@example.com",
"password": Something"
}'
```
***
### 3. Verify Data in MongoDB
Connect to MongoDB and list the databases to confirm the `Linqra` database was created:
```bash theme={null}
docker exec -it mongodb1 mongosh -u root -p mongopw --authenticationDatabase admin
show dbs
```
You should see output similar to:
```
Linqra 1016.00 KiB
admin 172.00 KiB
config 284.00 KiB
local 3.28 MiB
```
You should now see the `Linqra` database listed.
***
## 15. Keycloak Configuration for EC2
### Access Keycloak Admin Console
Access the Keycloak Admin Console at:
```bash theme={null}
https://linqra.com/keycloak/admin/master/console/
```
### 1. Create New Realm
1. Log in to the Keycloak Admin Console
2. Click on the dropdown in the top-left corner (default shows "master")
3. Click "Create Realm"
4. Configure the realm:
* Realm name: `Linqra`
* Display name: `Linqra`
* Frontend URL: `https://linqra.com/keycloak`
5. Ensure "Enabled" is switched ON
6. Click "Create"
### 2. Create New Client
#### General Settings
1. Navigate to "Clients" in the left sidebar
2. Click "Create client"
3. Configure the general settings:
* Client ID: `linqra-gateway-client`
* Name: `Linqra Gateway Client`
* Description: `Linqra Gateway Client`
* Always display in UI: `ON`
* Click "Next"
#### Access Settings
Configure the client's access settings:
* Root URL: `https://linqra.com`
* Home URL: `https://linqra.com`
* Valid redirect URIs: `https://linqra.com/callback`
* Valid post logout redirect URIs: `https://linqra.com`
* Web origins: `https://linqra.com`
* Admin URL: `https://linqra.com`
#### Capability Config
Set up the authentication capabilities:
* Client authentication: `ON`
* Authorization: `OFF`
* Authentication flow:
* Standard flow: `Enabled`
* Service accounts roles: `Enabled`
* All other flows: `Disabled`
### 3. Create Client Role
1. Navigate to the "Roles" tab in your client settings
2. Click "Create role"
3. Configure the role:
* Role name: `gateway_admin`
* Description: `Gateway admin role for the client id: linqra-gateway-client`
4. Click "Save"
### 4. Create Realm Role
1. Navigate to "Realm roles" in the left sidebar
2. Click "Create role"
3. Configure the role:
* Role name: `gateway_admin_realm`
* Description: `Role to identify the belongings of the Linqra realm`
4. Click "Save"
### 5. Assign Service Account Roles
1. Navigate to your client's "Service accounts roles" tab
2. You'll see the service account username: `service-account-linqra-gateway-client`
3. Assign both roles:
* Client role: `gateway_admin`
* Realm role: `gateway_admin_realm`
### 6. Create Client Scopes
#### a. Gateway Read Scope
1. Navigate to "Client scopes" in the left sidebar
2. Click "Create client scope"
3. Configure the scope:
* Name: `gateway.read`
* Description: `To read the gateway end points`
* Type: `Default`
* Display on consent screen: `ON`
* Include in token scope: `ON`
4. Click "Save"
#### b. Team Scope
1. Create another client scope:
* Name: `team.scope`
* Description: `Restricts access to specific teams`
* Type: `Default`
* Display on consent screen: `ON`
* Include in token scope: `ON`
2. Add a hardcoded claim mapper:
* Name: `teams`
* Category: `Token mapper`
* Mapper Type: `Hardcoded claim`
* Claim name: `teams`
* Claim value: `["67d0aeb17172416c411d419e"]`
* Claim JSON type: `JSON`
* Add to ID token: `ON`
* Add to access token: `ON`
* Add to userinfo: `ON`
### 7. Assign Roles to Client Scope
1. Navigate to the `gateway.read` client scope
2. Go to the "Scope" tab
3. Assign both roles:
* Client role: `gateway_admin`
* Realm role: `gateway_admin_realm`
### 8. Add Client Scopes to Client
1. Navigate to the `linqra-gateway-client` settings
2. Go to the "Client scopes" tab
3. Add both scopes as "Default":
* `gateway.read`
* `team.scope`
The configuration above is specific to the EC2 deployment environment. Make sure all URLs are using `https://linqra.com` instead of localhost URLs.
After configuring Keycloak, you may need to restart the Keycloak service to ensure all changes take effect:
```bash theme={null}
sudo docker compose up -d --build keycloak-service
```
## 16. Useful Docker Commands and Maintenance
### Check Running Containers
```bash theme={null}
docker ps
```
Example output:
```
76fb57dfd9a7 haproxy:2.8 "docker-entrypoint.s…" ... linqra-gateway-loadbalancer-1
6d35f7aee160 linqra-api-gateway-service "java -Djavax.net.de…" ... linqra-api-gateway-service-3
b926fdffecee linqra-api-gateway-service "java -Djavax.net.de…" ... linqra-api-gateway-service-2
40c635bed63d linqra-api-gateway-service "java -Djavax.net.de…" ... linqra-api-gateway-service-1
f39fd18fefe4 linqra-keycloak-service "/opt/keycloak/bin/k…" ... linqra-keycloak-service-1
a1294442aafa linqra-redis-service "redis-server /usr/l…" ... linqra-redis-service-1
0c4f29574158 linqra-mongodb2 "docker-entrypoint.s…" ... mongodb2
224725f44232 linqra-postgres-service "docker-entrypoint.s…" ... linqra-postgres-service-1
b2288bf0c2b6 linqra-mongodb3 "docker-entrypoint.s…" ... mongodb3
fed2910c43d5 linqra-discovery-service "java -Djavax.net.de…" ... linqra-discovery-service-1
2560a03d3bc1 linqra-mongodb1 "docker-entrypoint.s…" ... mongodb1
c83a6b2ec0cb linqra-pgadmin-service "/entrypoint.sh" ... linqra-pgadmin-service-1
```
***
### Check Disk Usage
```bash theme={null}
df -hT
```
***
### Stop All Containers and Remove Docker Images
```bash theme={null}
cd /var/www/linqra/
docker-compose down
```
Check Docker storage usage:
```bash theme={null}
sudo du -h --max-depth=1 /var/lib/docker
```
Remove all Docker data (network, volume, image):
```bash theme={null}
docker system prune -a -f
```
Check disk usage again:
```bash theme={null}
df -hT
```
Check all containers (including stopped):
```bash theme={null}
docker container ls -a
```
***
### Restart or Build Specific Services
Restart only the Keycloak service:
```bash theme={null}
sudo docker compose up -d --build keycloak-service
```
Restart only the Eureka server:
```bash theme={null}
sudo docker compose up -d --build discovery-service
```
You should see: [https://linqra.com/eureka/](https://linqra.com/eureka/)
Restart only the API Gateway service:
```bash theme={null}
sudo docker compose up -d --build api-gateway-service
docker logs linqra-api-gateway-service-1
```
Build and start all services:
```bash theme={null}
sudo docker compose up -d --build
```
***
### Test and Debug
Refresh routes:
```bash theme={null}
curl -k -H "Authorization: Bearer " -X GET https://localhost:7777/api/routes/refresh/routes -v
```
Get OpenID certs from Keycloak (on EC2):
```bash theme={null}
curl -v http://localhost:8281/keycloak/realms/Linqra/protocol/openid-connect/certs
```
Get OpenID certs from the gateway container:
```bash theme={null}
docker exec -it linqra-api-gateway-service-1 curl -v http://keycloak-service:8080/keycloak/realms/Linqra/protocol/openid-connect/certs
```
***
Let me know if you want to add more commands or explanations!
With the above GitHub secrets configured, your `ci.yml` workflow will automatically deploy all necessary files to your EC2 server whenever new code is merged into the `master` branch. This ensures a secure and automated deployment process.
We'll cover the Dockerization steps for your application in the next section.
## 12. Final GitHub Actions CI/CD Pipeline (`ci.yml`)
Below is the complete `ci.yml` workflow file used for automated deployment.\
**Once code is merged into the `master` branch, this pipeline will automatically build and deploy your application to the EC2 server—no additional manual steps are required.**
````yaml theme={null}
name: Linqra CI
on:
push:
branches: [ "master" ]
pull_request:
branches: [ "master" ]
permissions:
contents: write
jobs:
java-app:
runs-on: ubuntu-latest
steps:
- uses: actions/checkout@v4
# Upload API Gateway source files
- name: Upload API Gateway source
uses: actions/upload-artifact@v4
with:
name: api-gateway-source
path: |
api-gateway/**
!api-gateway/target/**
!api-gateway/target/
# Upload Discovery Server source files
- name: Upload Discovery Server source
uses: actions/upload-artifact@v4
with:
name: discovery-server-source
path: |
discovery-server/**
!discovery-server/target/**
!discovery-server/target/
# Upload docker-compose.yml
- name: Upload docker-compose file
uses: actions/upload-artifact@v4
with:
name: docker-compose
path: docker-compose-ec2.yml
# Upload root pom.xml
- name: Upload root pom file
uses: actions/upload-artifact@v4
with:
name: root-pom
path: pom.xml
# Debug and upload .kube directory with hidden files
- name: Debug .kube directory
run: |
echo "Checking .kube directory contents:"
ls -la .kube/
- name: Copy .kube to temporary directory
run: |
cp -r .kube kube-config
- name: Upload kube directory
uses: actions/upload-artifact@v4
with:
name: kube-config
path: kube-config/**
# Add this new step to upload keys directory
- name: Upload keys directory
uses: actions/upload-artifact@v4
with:
name: keys-config
path: keys/
if-no-files-found: error
# we build react here in the GitHub actions
react-build:
needs: java-app
runs-on: ubuntu-latest
defaults:
run:
working-directory: ./edge-service
steps:
- uses: actions/checkout@v4
- name: Create .env file
run: |
cat < .env
VITE_MONGODB_URI=${{ secrets.VITE_MONGODB_URI }}
VITE_MONGODB_DB_NAME=${{ secrets.VITE_MONGODB_DB_NAME }}
NODE_ENV=production
JWT_SECRET=${{ secrets.JWT_SECRET }}
VITE_WS_URL=${{ secrets.VITE_WS_URL }}
VITE_API_GATEWAY_URL=${{ secrets.VITE_API_GATEWAY_URL }}
REACT_APP_KEYCLOAK_URL=${{ secrets.REACT_APP_KEYCLOAK_URL }}
REACT_APP_KEYCLOAK_REALM=${{ secrets.REACT_APP_KEYCLOAK_REALM }}
REACT_APP_KEYCLOAK_CLIENT_ID=${{ secrets.REACT_APP_KEYCLOAK_CLIENT_ID }}
VITE_API_KEY=${{ secrets.VITE_API_KEY }}
VITE_API_KEY_NAME=${{ secrets.VITE_API_KEY_NAME }}
EOF
working-directory: ./edge-service
- name: Set up Node.js
uses: actions/setup-node@v4
with:
node-version: '21.5.0'
cache: 'npm'
cache-dependency-path: './edge-service/package-lock.json'
- name: Upgrade npm
run: npm install -g npm@10.8.1
- name: Remove package-lock.json
run: rm -f package-lock.json
- name: Install dependencies
run: npm install --legacy-peer-deps
continue-on-error: true
- name: Build React app
run: npm run build
env:
CI: false
- name: Run tests
run: npm test
env:
CI: false
# Upload React build
- name: Upload React build
uses: actions/upload-artifact@v4
with:
name: react-build
path: edge-service/dist
deploy:
needs: [java-app, react-build]
runs-on: ubuntu-latest
if: github.ref == 'refs/heads/master'
steps:
- name: Download all artifacts
uses: actions/download-artifact@v4
with:
path: artifacts
- name: Install SSH key
uses: webfactory/ssh-agent@v0.9.0
with:
ssh-private-key: ${{ secrets.EC2_SSH_KEY_PROD }}
- name: Deploy to EC2
env:
EC2_HOST: ${{ secrets.HOST_DNS_PROD }}
EC2_USERNAME: ${{ secrets.USERNAME_PROD }}
TARGET_DIR: ${{ secrets.TARGET_DIR_PROD }}
run: |
# Disable strict host key checking
mkdir -p ~/.ssh
echo "StrictHostKeyChecking no" >> ~/.ssh/config
# Rsync main directories (only changed/new files, with sudo on remote)
rsync -avz --delete --rsync-path="sudo rsync" artifacts/api-gateway-source/ $EC2_USERNAME@$EC2_HOST:/var/www/linqra/api-gateway/
rsync -avz --delete --rsync-path="sudo rsync" artifacts/discovery-server-source/ $EC2_USERNAME@$EC2_HOST:/var/www/linqra/discovery-server/
rsync -avz --delete --rsync-path="sudo rsync" artifacts/react-build/ $EC2_USERNAME@$EC2_HOST:/var/www/linqra/edge-service/
# Use scp for sensitive or always-fresh files
scp -v artifacts/docker-compose/docker-compose-ec2.yml $EC2_USERNAME@$EC2_HOST:/var/www/linqra/docker-compose.yml
scp -v artifacts/root-pom/pom.xml $EC2_USERNAME@$EC2_HOST:/var/www/linqra/pom.xml
# .kube and keys (if needed, use scp or rsync as appropriate)
if [ -d "artifacts/kube-config" ]; then
rsync -avz --delete \
--exclude 'mongodb/data1/' \
--exclude 'mongodb/data2/' \
--exclude 'mongodb/data3/' \
--exclude 'postgres/data/' \
--exclude 'pgadmin/data/' \
--rsync-path="sudo rsync" artifacts/kube-config/ $EC2_USERNAME@$EC2_HOST:/var/www/linqra/.kube/
fi
if [ -d "artifacts/keys-config" ]; then
rsync -avz --delete --rsync-path="sudo rsync" artifacts/keys-config/ $EC2_USERNAME@$EC2_HOST:/var/www/linqra/keys/
fi
# Set correct permissions for pgadmin
if [ -d /var/www/linqra/.kube/pgadmin/data ]; then
sudo chown -R 5050:5050 /var/www/linqra/.kube/pgadmin/data
sudo chmod -R 755 /var/www/linqra/.kube/pgadmin/data
fi
# Set correct permissions for MongoDB
for d in data1 data2 data3; do
if [ -d /var/www/linqra/.kube/mongodb/$d ]; then
sudo chown -R 999:999 /var/www/linqra/.kube/mongodb/$d
fi
done
if [ -f /var/www/linqra/.kube/mongodb/mongo-keyfile ]; then
sudo chown 999:999 /var/www/linqra/.kube/mongodb/mongo-keyfile
sudo chmod 400 /var/www/linqra/.kube/mongodb/mongo-keyfile
fi
# Ensure the parent directory exists
sudo mkdir -p /var/www/linqra/.kube/pgadmin/data
# Now set permissions
sudo chown -R 5050:5050 /var/www/linqra/.kube/pgadmin
sudo chmod -R 755 /var/www/linqra/.kube/pgadmin
# Ensure the sessions directory exists and is owned by pgadmin
sudo mkdir -p /var/www/linqra/.kube/pgadmin/data/sessions
sudo chown 5050:5050 /var/www/linqra/.kube/pgadmin/data/sessions
sudo chmod 700 /var/www/linqra/.kube/pgadmin/data/sessions
# Check that HAProxy config and cert files exist on the EC2 host
ssh $EC2_USERNAME@$EC2_HOST "
ls -l /var/www/linqra/.kube/gateway/haproxy.cfg
ls -l /var/www/linqra/keys/haproxy/gateway-combined-container.pem
"
# Ensure HAProxy cert file is readable by HAProxy in the container
ssh $EC2_USERNAME@$EC2_HOST "
sudo chmod 644 /var/www/linqra/keys/haproxy/gateway-combined-container.pem
"
echo "About to run SSH block"
ssh $EC2_USERNAME@$EC2_HOST "
# Set permissions
sudo chown -R ubuntu:ubuntu /var/www/linqra
sudo chmod -R 600 /var/www/linqra/keys/* || echo 'No keys to set permissions for'
sudo find /var/www/linqra/keys -type d -exec chmod 755 {} \;
sudo find /var/www/linqra/keys -type f ! -name 'mongo-keyfile' -exec chmod 600 {} \;
# Set correct permissions for mongo-keyfile
if [ -f /var/www/linqra/.kube/mongodb/mongo-keyfile ]; then
sudo chown 999:999 /var/www/linqra/.kube/mongodb/mongo-keyfile
sudo chmod 400 /var/www/linqra/.kube/mongodb/mongo-keyfile
fi
# Ensure HAProxy cert file is readable
if [ -f /var/www/linqra/keys/haproxy/gateway-combined-container.pem ]; then
sudo chmod 644 /var/www/linqra/keys/haproxy/gateway-combined-container.pem
fi
# Move to the deployment directory
cd /var/www/linqra
# Stop running containers
echo 'Stopping running containers'
sudo docker compose stop
# Prune unused images/containers/volumes/networks
echo 'Pruning unused images/containers/volumes/networks'
sudo docker system prune -a -f
# Check disk usage
echo 'Checking disk usage'
df -hT
# Ensure the Docker network exists
echo 'Ensuring the Docker network exists'
sudo docker network create linqra-network || true
# Build and start containers
echo 'Building and starting containers'
sudo docker compose -f docker-compose.yml -p linqra up -d --build
# Check if containers are running
echo 'Checking if containers are running'
docker ps
"
dependency-review:
if: github.event_name == 'pull_request'
runs-on: ubuntu-latest
steps:
- uses: actions/checkout@v4
- name: Dependency Review
uses: actions/dependency-review-action@v4
with:
fail-on-severity: high
## 13. Initial MongoDB Replica Set Setup (First Deployment Only)
On your very first deployment, you may encounter MongoDB issues because the replica set is not yet initialized.
**You only need to do this once.**
### 1. Connect to the Primary MongoDB Container
```bash
docker exec -it mongodb1 mongosh -u root -p mongopw --authenticationDatabase admin
````
You should see a prompt like:
```
test>
```
### 2. Initialize the Replica Set
At the `mongosh` prompt, run:
```javascript theme={null}
rs.initiate({
_id: "rs0",
members: [
{ _id: 0, host: "mongodb1:27017" },
{ _id: 1, host: "mongodb2:27018" },
{ _id: 2, host: "mongodb3:27019" }
]
}, { force: true });
```
You should see output similar to:
```
{ ok: 1 }
```
### 3. Check Replica Set Status
```javascript theme={null}
rs.status()
```
You should see a status object with `PRIMARY` and `SECONDARY` members.
***
**Note:**
* This setup is only required the first time you deploy your stack.
* For more information, see the [MongoDB Replica Set documentation](https://www.mongodb.com/docs/manual/replication/).
***
## 14. First Initial Data
After initializing the MongoDB replica set, you need to create the initial user and data for your application.
### 1. Exit the MongoDB Shell
If you are still inside the `mongosh` shell, type:
```
exit
```
***
### 2. Run the Initial Setup API Call
Use `curl` to create the first user and initialize the database:
```bash theme={null}
curl -k -X POST https://localhost:7777/api/setup/init \
-H "Content-Type: application/json" \
-d '{
"username": "linqrasa",
"email": "john@example.com",
"password": Something"
}'
```
***
### 3. Verify Data in MongoDB
Connect to MongoDB and list the databases to confirm the `Linqra` database was created:
```bash theme={null}
docker exec -it mongodb1 mongosh -u root -p mongopw --authenticationDatabase admin
show dbs
```
You should see output similar to:
```
Linqra 1016.00 KiB
admin 172.00 KiB
config 284.00 KiB
local 3.28 MiB
```
You should now see the `Linqra` database listed.
***
## 15. Keycloak Configuration for EC2
### Access Keycloak Admin Console
Access the Keycloak Admin Console at:
```bash theme={null}
https://linqra.com/keycloak/admin/master/console/
```
### 1. Create New Realm
1. Log in to the Keycloak Admin Console
2. Click on the dropdown in the top-left corner (default shows "master")
3. Click "Create Realm"
4. Configure the realm:
* Realm name: `Linqra`
* Display name: `Linqra`
* Frontend URL: `https://linqra.com/keycloak`
5. Ensure "Enabled" is switched ON
6. Click "Create"
### 2. Create New Client
#### General Settings
1. Navigate to "Clients" in the left sidebar
2. Click "Create client"
3. Configure the general settings:
* Client ID: `linqra-gateway-client`
* Name: `Linqra Gateway Client`
* Description: `Linqra Gateway Client`
* Always display in UI: `ON`
* Click "Next"
#### Access Settings
Configure the client's access settings:
* Root URL: `https://linqra.com`
* Home URL: `https://linqra.com`
* Valid redirect URIs: `https://linqra.com/callback`
* Valid post logout redirect URIs: `https://linqra.com`
* Web origins: `https://linqra.com`
* Admin URL: `https://linqra.com`
#### Capability Config
Set up the authentication capabilities:
* Client authentication: `ON`
* Authorization: `OFF`
* Authentication flow:
* Standard flow: `Enabled`
* Service accounts roles: `Enabled`
* All other flows: `Disabled`
### 3. Create Client Role
1. Navigate to the "Roles" tab in your client settings
2. Click "Create role"
3. Configure the role:
* Role name: `gateway_admin`
* Description: `Gateway admin role for the client id: linqra-gateway-client`
4. Click "Save"
### 4. Create Realm Role
1. Navigate to "Realm roles" in the left sidebar
2. Click "Create role"
3. Configure the role:
* Role name: `gateway_admin_realm`
* Description: `Role to identify the belongings of the Linqra realm`
4. Click "Save"
### 5. Assign Service Account Roles
1. Navigate to your client's "Service accounts roles" tab
2. You'll see the service account username: `service-account-linqra-gateway-client`
3. Assign both roles:
* Client role: `gateway_admin`
* Realm role: `gateway_admin_realm`
### 6. Create Client Scopes
#### a. Gateway Read Scope
1. Navigate to "Client scopes" in the left sidebar
2. Click "Create client scope"
3. Configure the scope:
* Name: `gateway.read`
* Description: `To read the gateway end points`
* Type: `Default`
* Display on consent screen: `ON`
* Include in token scope: `ON`
4. Click "Save"
#### b. Team Scope
1. Create another client scope:
* Name: `team.scope`
* Description: `Restricts access to specific teams`
* Type: `Default`
* Display on consent screen: `ON`
* Include in token scope: `ON`
2. Add a hardcoded claim mapper:
* Name: `teams`
* Category: `Token mapper`
* Mapper Type: `Hardcoded claim`
* Claim name: `teams`
* Claim value: `["67d0aeb17172416c411d419e"]`
* Claim JSON type: `JSON`
* Add to ID token: `ON`
* Add to access token: `ON`
* Add to userinfo: `ON`
### 7. Assign Roles to Client Scope
1. Navigate to the `gateway.read` client scope
2. Go to the "Scope" tab
3. Assign both roles:
* Client role: `gateway_admin`
* Realm role: `gateway_admin_realm`
### 8. Add Client Scopes to Client
1. Navigate to the `linqra-gateway-client` settings
2. Go to the "Client scopes" tab
3. Add both scopes as "Default":
* `gateway.read`
* `team.scope`
The configuration above is specific to the EC2 deployment environment. Make sure all URLs are using `https://linqra.com` instead of localhost URLs.
After configuring Keycloak, you may need to restart the Keycloak service to ensure all changes take effect:
```bash theme={null}
sudo docker compose up -d --build keycloak-service
```
## 16. Useful Docker Commands and Maintenance
### Check Running Containers
```bash theme={null}
docker ps
```
Example output:
```
76fb57dfd9a7 haproxy:2.8 "docker-entrypoint.s…" ... linqra-gateway-loadbalancer-1
6d35f7aee160 linqra-api-gateway-service "java -Djavax.net.de…" ... linqra-api-gateway-service-3
b926fdffecee linqra-api-gateway-service "java -Djavax.net.de…" ... linqra-api-gateway-service-2
40c635bed63d linqra-api-gateway-service "java -Djavax.net.de…" ... linqra-api-gateway-service-1
f39fd18fefe4 linqra-keycloak-service "/opt/keycloak/bin/k…" ... linqra-keycloak-service-1
a1294442aafa linqra-redis-service "redis-server /usr/l…" ... linqra-redis-service-1
0c4f29574158 linqra-mongodb2 "docker-entrypoint.s…" ... mongodb2
224725f44232 linqra-postgres-service "docker-entrypoint.s…" ... linqra-postgres-service-1
b2288bf0c2b6 linqra-mongodb3 "docker-entrypoint.s…" ... mongodb3
fed2910c43d5 linqra-discovery-service "java -Djavax.net.de…" ... linqra-discovery-service-1
2560a03d3bc1 linqra-mongodb1 "docker-entrypoint.s…" ... mongodb1
c83a6b2ec0cb linqra-pgadmin-service "/entrypoint.sh" ... linqra-pgadmin-service-1
```
***
### Check Disk Usage
```bash theme={null}
df -hT
```
***
### Stop All Containers and Remove Docker Images
```bash theme={null}
cd /var/www/linqra/
docker-compose down
```
Check Docker storage usage:
```bash theme={null}
sudo du -h --max-depth=1 /var/lib/docker
```
Remove all Docker data (network, volume, image):
```bash theme={null}
docker system prune -a -f
```
Check disk usage again:
```bash theme={null}
df -hT
```
Check all containers (including stopped):
```bash theme={null}
docker container ls -a
```
***
### Restart or Build Specific Services
Restart only the Keycloak service:
```bash theme={null}
sudo docker compose up -d --build keycloak-service
```
Restart only the Eureka server:
```bash theme={null}
sudo docker compose up -d --build discovery-service
```
You should see: [https://linqra.com/eureka/](https://linqra.com/eureka/)
Restart only the API Gateway service:
```bash theme={null}
sudo docker compose up -d --build api-gateway-service
docker logs linqra-api-gateway-service-1
```
Build and start all services:
```bash theme={null}
sudo docker compose up -d --build
```
***
### Test and Debug
Refresh routes:
```bash theme={null}
curl -k -H "Authorization: Bearer " -X GET https://localhost:7777/api/routes/refresh/routes -v
```
Get OpenID certs from Keycloak (on EC2):
```bash theme={null}
curl -v http://localhost:8281/keycloak/realms/Linqra/protocol/openid-connect/certs
```
Get OpenID certs from the gateway container:
```bash theme={null}
docker exec -it linqra-api-gateway-service-1 curl -v http://keycloak-service:8080/keycloak/realms/Linqra/protocol/openid-connect/certs
```
***
Let me know if you want to add more commands or explanations!